
ASLSK3 (2007)
The third offering in the Starter Kit line brings more real estate to your table top than either of its predecessors did. There is some new terrain to contend with, along with a new class of Gun. In keeping with the all-in-one experience, the third Kit also includes a pair of “official” ASLSK dice, two and a half sheets worth of playing pieces, more charts than ever before, eight scenarios, and 40 pages of reading material. But who am I kidding? The real hook is the cats. ASLSK finally gives players something to whiz and clank around the windy network of roads. I mean, what newbie can resist the opportunity to drive a Puma, or a Panther? Starter Kit 3 has both. As the cover art hints, it also has Tigers, and really big Tigers too. But first, the mundane mapboards.
New growth
There is only so much that one can accomplish with less than a dozen flavours of terrain. The garden gnomes have not been completely idle. Shrubbery has sprouted on all of the new boards in ASLSK3. The fresh growth with the marsh-like map symbols is not marsh. Nor is it tropical grass, which incidentally is what ASL transforms grain into for scenarios set in a tropical environment. Brush, as the new green stuff is officially known, is similar to grain. These sparsely treed areas are characterized by juvenile trees and dense ground cover. The latter makes brush more time consuming to traverse. Like grain, Brush is a hindrance to same-level fire, and provides no Terrain Effects Modifier (TEM). Unlike grain it is always “in season.” In other words, Brush remains a hindrance regardless of the time of year, and therefore, entry costs remain unchanged.1 Brush might strike some as a poor cousin of woods. However, when it is raining mortar bombs, brush is a darn sight safer than woods, because Air Burst does not apply. Now let’s consider the overall nature of the mapboards; there are three of them.
 |
| Brush up on your terrain recognition |
Home on the range
The small hill excepted, board t is a more “open” version of board x (from ASLSK2). Board t is what some would call “tank country,” because it allows Armored Fighting Vehicles (AFV) room to manoeuvre. Crossing a grain field requires no more effort of a tank than crossing Open Ground does. Good tank country tends to allow for long lines of sight. Huge swaths of grain defeats this purpose, although it does provides cover. But cover for who? There are heaps of places for anti-tank weapons to hide. In fact, when the grain is out of season, board t might be described better as “anti-tank country.” Furthermore, a well-sited Gun emplaced on the heights can dominate a third of the board—so much for “tank country.” Board t is not necessarily infantry-friendly either, especially if enemy armor is on the prowl. What “rally terrain” exists is confined mainly to the periphery.2 Also, the vast grainfields can become killing fields fast when Infantry is fired upon from higher ground.
 |
| Board 1 as anti-tank country |
Lines on the map
In my previous post, I forgot to underline a subtle and important difference between multi-hex buildings in ASL and ASLSK. All multi-hex buildings in ASL rise to at least one and a half levels above the base level of their hexes. Not so in ASLSK, where no building rises higher than one level above its base level. Simply put, there are no two story houses, let alone multi-story buildings, in Starter Kit.3 This keeps LOS straightforward when drawn from one hill to another across any building structure. The other thing that is not immediately noticeable in the diagram above is how the presence of only one story houses amplifies the plateau effect of hills in the game. If a unit is on a hill in ASLSK, and barring a Scenario Special Rule (SSR) to the contrary, no obstacles or hindrance terrain rising from ground level will ever interfere with LOS between units on a hill.
While I am on the subject, I have to wonder why the ASLSK rules for hills do not spell out how LOS works between units at different elevations. It may be that LOS is self evident to players with prior experience of wargames. However, I prefer not to take a fundamental concept like LOS for granted.
In ASLSK, a unit is either at ground level, or on a (level-one) hill. Although ASLSK states that a “Crest Line is formed in every hex where two different full-level elevations meet,” the rules do not explain just how these LOS are determined. The example in the ASLSK rule set provides a practical illustration. The rules for hills nonetheless omit the following (in my view, pertinent) text: A lower level unit may trace a LOS into only the initial Crest Line hexside of each level above it. Likewise, a unit may trace a LOS to a lower level only if the higher unit traces its LOS through a Crest Line as it leaves its hex and this LOS never recrosses another Crest Line of the same elevation.4 I have attempted to highlight the impact of Crest Lines on LOS in the context of board v below. My apologies to the cartographically gifted.
 |
| Board v: a board with a view |
At first glance, board v appears to offer good cover, but looks, and LOS, are deceiving. The hills on board v afford some very extended LOS, even by ASL standards.5 From the B hexrow (Hill A in the diagram above), one can see as far as the FF hexrow (Hill C). Under certain conditions, a German HMG can reach out and touch someone 30 hexes away. At 40 metres per hex, that is well beyond a kilometre (or three-quarters of a mile)!6 I draw your attention to these LOS because in a couple of scenarios it may actually matter. Take “Sherman Marches West” for example. An optimally sited HMG can bring fire to bear on any Soviet soldier reckless enough to poke his head over the crest of a hill.
For similar reasons, Board v is a good place for some long-range gunnery practice. The Russian MTR on Hill C is 20 hexes (800 metres) from the German HMG stack, the maximum range for this light mortar. Draw your LOS string a little farther, and you will discover that it is 30 hexes—as the ASL crow flies—from the AT Gun (Hill A) to the lend-lease tank (Hill C). The Sherman is well within the 75-hex, or 3000-metre range of the Pak 38 (as shown in brackets on the bottom right-hand corner of the counter). There is a technical problem, however.
Off the chart
Starter Kit range finders apparently are not calibrated for ranges beyond 24 hexes (960 metres). Thirty hexes is literally off the chart in ASLSK. The ASL TH Table below has values for ranges in excess of two kilometres, but is largely incompatible with the manner in which ASLSK calculates hits.7 Regrettably, I cannot offer much guidance, other than to suggest that players adopt a house rule that prohibits ordnance from firing at ranges in excess of 24 hexes.
 |
| The C3 To Hit Table from the ASLRB2 |
Another oddity of the ASLSK TH Chart is the lack of a value for range zero, or in-hex fire. Of course, some weapons have a minimum range that prohibits such fire. Still, there are plenty of weapons that could fire at targets, if only the ASLSK rule set would let them. I would like to say that I saved this revelation until now because firing within one’s own hex is irrelevant to ASLSK2. The truth is that Jay Richardson refreshed my memory between posts. Thanks Jay!
Infantry can only enter an enemy hex during the Advance Phase (APh). Thereafter, opposing Infantry in the same hex8 can attack each other only during the Close Combat Phase (CCPh), and without the aid of Support Weapons (SW) or Guns. However, as we shall see, vehicles do not play by the same rules. But I am getting ahead of myself.
 |
| The utility of board u in ASLSK3 |
Town and country
The last board in the Kit is designed as two half-boards in one.9 The urban half is the setting for S23 “Monty’s Gamble,” a scenario that takes place on the outskirts of Arnhem, in September 1944. Coupled with the more developed half of board v, the built-up area on board u becomes the Cretan village of Galatas in S27 “Stand for New Zealand.” A very different playing area is created when the same portion of board v is joined to the rural half of board u, the scene for S25 “Early Battles.” Whereas S25 takes place in Kaunas, Lithuania during the first week of Operation Barbarossa, S20 “Joseph 351” is set in the French countryside near Pointe de Corsen during the last week of August 1944. The terrain of Brittany is replicated by butting hexrows X-GG with hexrows GG-W of board v. The European tour of board u culminates in S26 “Last Ally, Last Battle.” It is October 1944. Big cats prowl the Hungarian plain near Debrecen, their prey, Stalin’s eponymous steel giants. Pete Shelling’s three-board, heavy-metal slugfest epitomizes what Starter Kit 3 is designed to do: put you in the commander’s seat of a cardboard tank.
 |
| King of the castle - a Pz VIB on Castle Hill in Buda |
Steeling the show
There is no shortage of seats to choose from. Starter Kit 3 contains 46 types of Armored Fighting Vehicles (AFV) represented by 105 ⅝” playing pieces. Five “nationalities” are provided for in the Kit. The Germans have the lion’s share with 21 different tanks, Assault Guns (AG), Tank Destroyers (TD), and Armored Cars (AC). The Soviets, or Russians, receive ten tanks of varying weight class, including three variants of the famous T-34. The American order of battle consists of seven different models of the equally famous M4 Sherman tank. In fact, half of the “British” vehicles in ASLSK3 are actually Sherman variants, as is one of the Soviet tanks. The impoverished Italians rate only two AFV, one of which is the diminutive L3/35 tankette.10 Before you snub your nose at Il Duce’s knights in slight armor, I should caution you that the British, Germans and Russians field their own “tin cans” in ASLSK3.
Starter Kit 3 also includes 16 types of Guns. Among these is a class of Gun not found in ASLSK2. Infantry Howitzers (INF) were often hand-me-down artillery pieces employed by infantry rather than artillery units. The Russian 76.2mm PP obr. 27 INF Gun was one of the better weapons of its kind. The lightly-armored panzers in “Early Battles” would do well to avoid it.
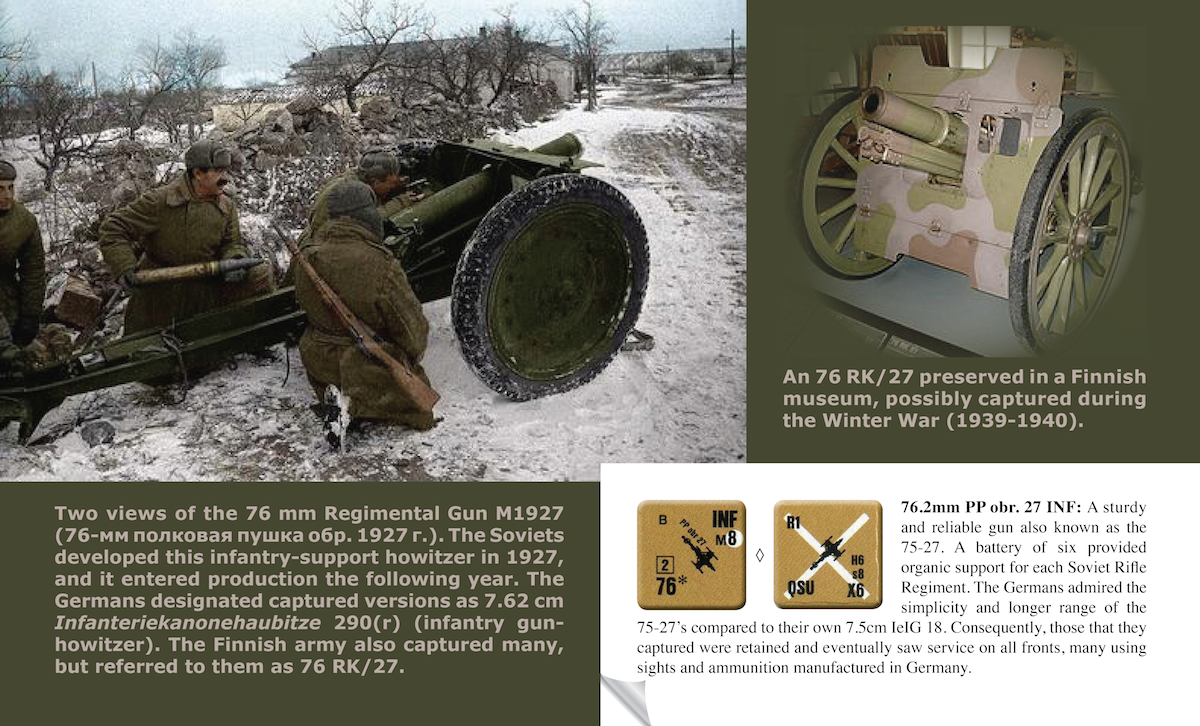 |
| The versatile 76.2cm PP obr. 27 regimental gun |
The generous selection of AFV and Guns in ASLSK3 is accompanied by ten pages of vehicle and ordnance notes. The publisher thoughtfully bundled this information into a separate, 12-page booklet. The notes are almost identical to those found in Chapter H of the ASLRB2. However, unlike the notes in the ASLSK2 rule set (and the “notes” shown in my diagrams), the counter artwork is black and white. It is a sensible compromise that helps keep printing costs down, especially in later reprints. The back of the Vehicle and Ordnance Historical Notes booklet has a useful key to the symbols and text found on vehicle and ⅝” ordnance counters. I recommend that new players familiarize themselves with the symbols and their meanings before pushing cardboard about the map. Additional explanatory text compensates for the lack of colour cues.
 |
| Mickey Mouse meets the new neighbours |
Lest we become mired in the minutiae of specific vehicles and weapons, I think it best to step back for a moment and consider what AFV bring to the game. Those of you with a number of infantry-only scenarios under your belt may have developed a sense for pace of play. Under ideal conditions, Infantry can never move farther than nine hexes on foot.11 So you may have a good idea for where opposing forces can be at the end of any given MPh or turn. Vehicles can play havoc with your senses. Most AFV can cross a board width in a single MPh, while some can traverse an entire board length in the same time frame. However, AFV can do more than drag race. Although specific abilities vary from vehicle to vehicle, most AFV can perform important tasks along the way. In fact, some of these tasks can only be performed by AFV. But let’s begin with the three main characteristics of AFV: mobility, protection, and firepower.
Mobility
Generally speaking, motorized transport in ASL expends Movement Points (MP) rather than Movement Factors (MF). For movement purposes, there are only two types of vehicles in ASLSK3: Fully Tracked and Armored Car (AC). Vehicles expend MP when starting, entering a new hex, pivoting—changing Vehicle Covered Arc (VCA) in ASL-speak, in Delay (only while vehicle is stopped), firing a Smoke Dispenser, or stopping.12
A Fully-Tracked vehicle has a white, rounded rectangle, similar to a track, behind its MP number. The T-34 tank in the photograph above is Fully-Tracked. Assault guns, such as the Sturmgeschütz III (StuG III), and tank destroyers, such as the Jagdpanzer (JgdPz) IV/70, are likewise Fully Tracked. An AC is a wheeled vehicle. Most AC are readily identifiable by the white circle, or “wheel” behind their MP numbers.13 The Panzerspähwagen (PSW) Sd.Kfz. 232 in the diagram below is an AC. A vehicle with a red MP number, such as the lumbering King Tiger, is mechanically unreliable and prone to breakdown.14
 |
| The tortoise and the hare on their cross-Europe race |
The diagram above is a graphic illustration of how tracked and wheeled vehicles differ. An AC usually has more MP to spend, a measure of its relative speed, than a tank does. However, when driving off road, a wheeled vehicle is at a distinct disadvantage. It takes more effort, in the form of MP, to negotiate the same terrain that a tracked vehicle moves through with comparative ease. Contrary to Hollywood feats of wonder, however, even an armored-plated car cannot crash through the walls of an ASL building. One might be tempted to conclude that this famous Tiger tank is king of the ASL jungle.
As with many things ASL, it depends. Although a Fully-Tracked vehicle may enter woods by expending as little as half of its MP allotment, entry comes at some risk. Whenever a vehicle enters “boggy” terrain like woods or buildings, there is a possibility that it may become hung up, or stuck. This possibility is factored into the game by means of a compulsory Bog Check. In our example above, the King Tiger would become bogged in a woods hex on a Bog Check Dice Roll (DR) of seven or greater, once the various Dice-Roll Modifiers (DRM) are factored in. A more prudent commander would order his driver to enter more slowly, expending the tanks entire MP allotment in the process. In this case, the Tiger would bog only on a DR of ten or greater. If this 68-tonne behemoth has problems bulldozing a trail through woods, what hope is there for a tin-on-wheels PSW 232? More than you might expect, because this eight-wheeled scout car has Low Ground Pressure. The square around the unit identification (ID) letter (top left-hand corner of the counter) indicates that this vehicle is very efficient at distributing its weight across all four axles. In spite of its wide tracks, the PzKpfw VIB does a poor job of distributing its weight, and is therefore considered to have High Ground Pressure, as evidenced by the circle around its ID. On the surface, bogging may strike some as an annoying, but temporary inconvenience. However, failed attempts to unbog can leave a vehicle permanently Immobilized, unable to move or change VCA.
 |
| Making sense of VCA and Armor Facings (AF) |
The importance of being able to change VCA is threefold. The first concerns movement. Just as a Gun must change its Covered Arc (CA) in order to engage a target outside its current Field of Fire, a vehicle must also change its VCA in order to changes its direction of travel. Otherwise, a vehicle may only enter a hex within its current VCA. In the diagram above, the Sherman “Firefly” may only enter hex W6 or X5. In order to enter Y6, the tank must first change its VCA. The Firefly does this by rotating one hexspine to the right, and expending one MP while still in X6. Incidentally, any time that a turreted vehicle expends a MP, it may change its Turret Covered Arc (TCA) freely. If, instead, the tank wished to fallback, via hex Y7, it would have to make two CA changes, paying one MP for each rotation. The Sherman could not back up, or reverse into Y7, because there is no reverse gear on the vehicles supplied in ASLSK. Reverse Movement is permitted in ASL, but evidently Mr. Dunn prefers to do “donuts” with his tanks.
Another reason why VCA is so important is that the VCA usually corresponds to a vehicle’s strongest armor. The thick front hide of a King Tiger is of no consequence if its nose is buried in woods, while its tail end is exposed to the business end of a Firefly. There is more to the story than this, but I think this highlights a major downside to being immobile, even temporarily. Finally, VCA is of critical importance to non-turreted vehicles, most of which can only fire their primary weapons through their VCA. Should a vehicle be unable to change VCA and engage a threat, or flee to fight another turn, it will have to rely on its defensive capabilities.
Protection
The best way to survive on the cardboard battlefield is to avoid being hit. Once hit, an AFV must rely on the protection of its armor. All of the AFV in ASLSK3 are Closed-Topped (CT), meaning that when the hatches are closed and latched, their crews are virtually invulnerable to Small Arms Fire, be it rifle fire, MG, or hand grenades. There is some advantage to be gained from being Crew Exposed (CE). The MP expenditure for traveling on roads is usually halved, and it is easier to hit targets with ordnance fire. However, remaining Buttoned Up (BU) reduces the risk that a crew member will be injured or killed by enemy fire. The consequences of such casualties include temporary incapacity (“stunned”), long-term degradation of crew performance—a +1 DRM on most crew activities, and occasionally Recall from battle.
Just as a crew can avoid being hit by staying BU, a vehicle can avoid being hit by staying in Motion, and using a Smoke Dispenser, if so equipped. Smoke Dischargers (sD), Smoke Mortars (sM), Smoke Pots (sP), and the dual-purpose Nahverteidigungswaffe (sN), or Close Defence Weapon, each work differently. Smoke Pots may only be fired while CE, whereas a Nahverteidigungswaffe may only be fired if the crew is BU, for example. The German Close Defence Weapon is also used in Close Combat (CC). In this case, however, the weapon fires anti-personnel munitions, and delivers a memorable, unmodified, 16-firepower (FP) attack. Fortunately, for the Allies, this device did not appear on German AFV until mid 1944. A similar S-Mine discharger was, however, fitted to the rear deck of early models of the PzKpfw VIE, or Tiger I. The S-Mi35 anti-personnel mine was known variously as the Schrapnellmine, Springmine, or Splittermine in German. It is popularized in English as the “Bouncing Betty.”
 |
| La bara d'acciaio (steel coffin) |
The size of an AFV also contributes to its ability to survive another turn right side up on the ASL battlefield. Hitting the flank of a Kliment Voroshilov II tank is akin to hitting the broadside of a barn door. But good luck keeping a Carro Veloce L3/35 tankette in your cross hairs for long. The ASLSRB divides vehicles into five categories according to size, ranging from very large to very small. Large targets are easy to spot on an ASL mapboard because they have at least one of their Armor Factors (AF) printed in red. If both AF are red, the vehicle is considered a very large target. Small targets work the same way. A vehicle with white circles behind both AF is a very small target. A vehicle with none of these tell-tale signs is considered to be of average size, such as the T-34 M43 shown in an earlier illustration. Of course, once a hit is secured, size no longer matters.
 |
| Дредноут (Dreadnought) |
When all else fails, a vehicle must rely on its armor to survive. The relative effectiveness of armor is represented in ASL by an Armor Factor (AF). The AF takes into account, among other things, the quality of the steel, its thickness, and its slope, if any. Each AFV is assigned two printed AF ratings. These numerical ratings are located beneath the MP number on the vehicle counter. The uppermost rating is a measure of the strength of the front armor. Any hit scored through the front Target Facing (which normally coincides with the VCA) is deemed to strike the front armor. If this number is encased in a circle or a square, it indicates that the turret (or upper superstructure) is either weaker or stronger, respectively, than the value shown.
The bottommost AF rating works the same, except that it represents the armor on the side and the rear of the vehicle. (Some of you may question why the AF ratings for the side and rear are the same. Worry not, this is accounted for separately when a hit strikes the rear Target Facing.) There are eleven unique AF, as shown in the table below. Note that AF 0 does not mean that a vehicle has no armor. It does. The armor may negligible, but it is enough to protect the vehicle and its crew from Small Arms fire.
 |
| ASL Armor Factors (AF) |
Let’s assume that a round has struck the hull of the M4A3(105) above—referred to as a hull hit in the game.15 For the purposes of calculating any penetration, the AF is 11. Had the round struck the turret instead, the AF would be 8, because the Sherman is considered to have an Inferior Turret on this particular Target Facing. However, if a round were to strike the side of the turret, the AF would be 6, because the M4A3 has a Superior Turret on its side Target Facing.
Relying on steel plate to protect you should be your last recourse. Sometimes the best defence is a good offence.
Firepower
Mobility and protection help keep AFV from becoming scrap metal. However, the purpose of your AFV is not to avoid contact with the enemy. Rather, the point is to seek out and engage the enemy on your terms. Some vehicles are better equipped to do this than others are. But all AFV in ASLSK pose a threat due to the weapons they carry, and their ability to eliminate broken units in the Rout Phase (RtPh)—without so much as firing a shot. I will not expand upon the latter ability. It lies in the realm of tactics. Instead, I would like to examine some of the weaponry that AFV have at their disposal.
Each AFV in ASLSK3 is equipped with an inherent main armament (MA). An MA is either bow-mounted, like the MG in an Italian tankette, or turret-mounted, like the heavy howitzer in a Soviet “Dreadnought.”16 Turreted vehicles have obvious advantages over Non-Turreted (NT) ones. In the case of the KV-2 though, the heavy turret rotates so slowly that it pays the NT traverse DRM when changing its Turret Covered Arc (TCA).
 |
| No Armor Leaders :( |
The TCA operates independently of the VCA. Whenever the TCA points to a hexspine that does not coincide with that of the VCA, a turret counter is placed on the vehicle to reflect this fact. A turret counter is also placed on a (CT) vehicle if it is CE, even though the VCA and TCA may be the same. In both cases, the TCA is defined by the hexspine that the Gun on the turret counter points toward. The TCA delineates the Field of Fire of all turret-mounted weapons. Therefore, a vehicle need only change its TCA to fire a turret-mounted weapon, not the entire vehicle. The TCA is also used to determine the Target Facing of the turret when struck by enemy fire.
There are four classes of turrets in ASL; ASLSK3 has three. Any AFV with a large, thin, white circle on its counter is fitted with a Fast Turret Traverse (T). The MA of such a vehicle is considered to be operated by a three-man turret crew (gunner, loader, and commander). The M4A2 (L) Sherman tank below benefits from this type of turret. An AFV with a large, thin, white square on its counter is considered to have a Slow Turret Traverse (ST). This class of turret is used to represent a two-man turret crew, or a heavy, manual-traverse turret (with a three-man turret crew). The Vickers Mark VIB Light Tank, farther below, is an example of the former, while a King Tiger is an example of the latter. The last class of turret is often misplayed. In certain tanks, such as the T-34 M43, the commander also doubled as the gunner. Moreover, when the commander was observing above deck, neither the MA, nor the coaxial MG (CMG) could be fired. (I will get to CMG in a moment.) Tanks with this substandard arrangement are handicapped in ASL by having a Restricted Slow Traverse (RST) turret, signified by a large, thick, white square on the counter. An RST turret is treated the same as an ST, except that an AFV with an RST turret may never fire its MA or CMG while CE. Etch that last bit in your brain. It is often forgotten in the heat of battle, even by veteran players.
 |
| Coming to terms with AFV terminology |
Many vehicles have an inherent MG armament. In some cases, an MG is the MA. Regardless of whether the MG armament represents an MA or an auxiliary weapon, it is indicated in the same manner on the counter.17 In the lower right-hand corner of the M4A2 (L) counter above, there are three numerals, separated by forward slashes. Each numeral represents a MG FP factor. These numerals always appear in the same order, and refer to the position and/or type of MG: bow, coaxial, or anti-aircraft. If no AAMG is present, only the first two values will appear. In addition, a hyphen replaces the FP number of any bow or coaxial MG that is not present.
A bow-mounted MG (BMG) may fire only at a target that lies within the VCA of its vehicle.18 Most Anti-Aircraft MG (AAMG) suffer no such restrictions, and may fire in any direction. That said, most vehicles must be CE in order to fire their AAMG. The Normal Range of BMG and AAMG is eight hexes.
A coaxial MG (CMG) is mounted beside and/or on the same axis as the primary armament—which in most cases is the MA. Assuming that the MA is turret mounted, a CMG may only engage targets within the TCA. Furthermore, if a CMG is fired at anything but the target currently acquired by the MA, Acquisition is lost. A CMG has a Normal Range of twelve hexes, eight for any MG mounted in the rear of the turret. A Rear MG (RMG) cannot be fired in the same phase in which the MA fires, and may only engage targets in the rear Target Facing of the turret. The presence of an RMG is noted on a vehicle counter by means of a superscript “R” value that immediately follows the appropriate MG FP number (if any). The KV-2 shown earlier in the post, has a turret RMG, which brings me to my next point.
 |
| Miss Piggy |
The Russian “bunker buster” lacks a large, white circle or square on its counter because it is treated as a Non-Turreted (NT) vehicle, despite the fact that it is turreted. However, the lack of any such markings is consistent with a NT AFV such as the late-war version of the German assault gun pictured above. The MA of a NT AFV is fixed, and usually bow-mounted. Therefore, the MA may not rotate independently of the vehicle, and may only fire through the vehicle’s CA. By their very nature, most CMG on NT vehicles are likewise restricted to firing through the VCA. Vehicle counters tend to have cues for this sort of information. For instance, the five-pointed star following the CMG FP value on the StuG IIIG (L) counter above is your cue to consult the back of the playing piece. There you will find another star with the following text next to it: “MG:VCA only.” The asterisk next to the AAMG FP value is a different type of cue. It prompts you to consult the vehicle note in the Historical Notes booklet.19 There you will learn that the AAMG may be fired only when the crew is BU.
How and when can you use this alphabet-soup of weapon types is the subject of the next section.
Going the distance
Armored Fighting Vehicles are mobile weapons platforms equipped with a variety of passive and active combat systems. They can screen enemy positions with chemical smoke, or suppress them with fire. Some AFV are seemingly spoilt for choice, having access to White Phosphorus (WP) in addition to Smoke, and special armor-defeating rounds, in addition to Armor Piercing (AP) and High Explosive (HE).20 Still other AFV are bristling with MG and rapid-fire cannon that can be fired at different targets, or combined into one powerful attack. Given the array of weapons at their disposal, it is tempting to use AFV as fire bases, covering Infantry, while they close with the enemy. Indeed, their very mobility allows these modern-day knights to reposition quickly, and keep pace with the advance. But AFV can do so much more.
 |
| Early M3 flight trials |
During the MPh, vehicles can go places where no infantryman has gone before, and do things that infantrymen can only dream of doing in ASLSK.21 Closing with the enemy is a two-step process for Infantry. First, an Infantry unit must move adjacent to an enemy position. Assuming it remains unbroken and unpinned, the unit may advance into the enemy hex during the Advance Phase (APh). The only thing that AFV can do meanwhile is become BU or CE. However, vehicles more than make up for their APh pit stop by being able to enter an enemy hex during the MPh—some conditions apply. This signature trait is complemented by another special trait, the ability of a vehicle to fire its weapons at any point during its MPh. More than anything else, these two facets of vehicle behaviour change the way the game is played.
There is some fine print in the rules concerning when a vehicle may remain (voluntarily) in the same hex as an enemy AFV. However, for the most part, a vehicle can come and go as it pleases, within the limits of its MP allotment and any terrain restrictions. If so inclined, a vehicle can begin its MPh in an enemy hex, leave,22 enter any number of other enemy hexes, stop temporarily in one or more of them, restart, and end its MPh either in Motion, or stopped in yet another enemy hex. Bad manners will seldom go unchallenged. Then again, if a vehicle can pull off such a stunt, it can leave a trail of broken and demoralized Infantry, one or more wrecks, and a smoke-enshrouded hex in its wake.
A vehicle equipped with some form of smoke dispenser, for example, may attempt to place smoke during its MPh. Provided the vehicle has not fired earlier in the MPh, it may make a usage DR, and if successful, expend a MP to place dispersed smoke either in its own hex, or in the case of a smoke mortar at a range of 1-3 hexes within the AFV’s TCA. The real fun is just beginning though. An AFV can conduct “drive-bys” that will demoralize any broken unit that it comes in contact with. The AFV only need move adjacent to a broken enemy unit to place it under the effects of Desperation Morale (DM). If an AFV commander is particularly mean spirited, he can escalate the encounter to a “drive-by shooting.”
Bounding First Fire is the term used to describe fire attacks made by a vehicle during its MPh. A vehicle need not stop to fire. The effectiveness of a fire attack conducted during the MPh is dependent upon a number of factors, but it should come as no surprise that Motion Fire is the least effective form of Bounding First Fire. More commonly, Bounding First Fire occurs after a vehicle has expended a MP to stop. Vehicles normally have one “drive-by shoot” in them per MPh. This is due to the rule that requires all auxiliary weapons to be fired from the same hex (although not necessarily at the same target) as the MA during the MPh. Should the MA maintain Rate of Fire (ROF), it may fire again from the same hex (after expending an additional MP), or move to another hex, and fire from there. Alternatively, the vehicle may hold fire until the Advancing Fire Phase (AFPh), when it could take one additional shot with its MA. In neither exception may any other weapons fire. Let me illustrate Bounding First Fire with a couple of examples.
Remember board t, the one blanketed in grain? Watch as a reconnaissance vehicle of Panzer-Division “Hermann Göring” reaps a deadly harvest in “Another Summer’s Day” below.
 |
| Hermann's Germans in sunny Sicily |
Interesting things occur when a vehicle enters an enemy hex. For starters, opposing units in the same hex may only fire at each other (unless in Melee), and not at any unit outside of their hex. Be mindful of players who deliberately use this rule to their advantage to “lock down” the fire of an opposing unit. In order to restrict enemy fire in this manner, a vehicle must end its MPh in the enemy hex. However, the vehicle need not stop, remaining in Motion will do just fine. Moreover, mobile vehicles are never held in Melee, and are therefore free to fire, or leave the hex in a later turn. The freedom afforded to mobile vehicles makes them elusive prey for Infantry bent on immobilizing or destroying them without the aid of anti-tank weapons. Infantry may attempt to attack a vehicle when it enters their hex, but not without some risk to themselves. Before it can attack, most Infantry units have to pass a Pre-AFV Assault/Attack Task Check, or PAATC—pronounced “patsy.” If a unit fails a PAATC, it is pinned, and may not attack. If it passes the TC, it may conduct a Close Combat Reaction Fire attack. The odds of success usually are poor, however, due to the added DRM for not playing fair. Because even if a vehicle stops after entering an enemy hex, it is still considered a moving target for the purposes of Defensive Fire, including Reaction Fire.
Vehicles do not have everything their way; they are penalized (as are Guns) when they attempt to hit a target within their own hex, but only if firing as ordnance. The rationale behind the penalty is the added difficulty in tracking a target at close range. Weapons with a high rate of fire, such as auto cannon and MG are not restricted, however. But the real kicker is the modifier for firing these corn cutters at close range. All small arms fire—including the Inherent FP of Infantry units, anti-tank rifles (ATR), and MG, as well as the Infantry Firepower Equivalent (IFE) of 12.7mm-40mm AA Guns, is eligible for Tripled Point Blank Fire (TPBF) when fired in hex. Faced with bazooka-less Infantry, a BU AFV in S22 can play harvester combine with relative impunity.23
 |
| Red Army wrecking crew examines its handiwork |
When faced with an armored juggernaut, Bounding First Fire can be the great equalizer.24 Many a Panther tank met a violent end when a T-34 or a Sherman drove around its flank and delivered an AP round into its weaker side or rear. Another advantage of Bounding First Fire is that the AFV engaging in such fire is considered to be a moving target for the purposes of Defensive Fire.25 The fact that an AFV stops to fire during its MPh does not change the fact that it has entered a new hex that turn, and therefore remains a moving target. That a moving target is harder to hit than a stationary target is self evident. Less obvious is the advantage that this affords an AFV that Bounding First Fires.
When a T-34 rolls up on the flank of a Panther and stops, the T-34 faces a stationary target, while the Panther faces a moving target. When the Panther changes its TCA (or VCA) in order to engage the Russian tank, it will incur additional To Hit DRM, making it harder to hit the T-34. Granted the Russian AFV incurs a number of To Hit DRM for having moved, but its TCA can be freely aligned with its target before the vehicle stops. The Panther may well hit and destroy the T-34. But if it does not, the Russian tank will have an opportunity to hit the weaker hull armor of the German tank. Admittedly, the Panther could change its VCA, and incur extra To Hit DRM, which in turn would lower the odds of hitting the T-34.
Should the T-34 fail to destroy the German tank, another Russian AFV could try from a different direction. Unless the Panther maintains Rate of Fire, it may not be able to a prevent a second assailant from using Bounding First Fire against it. (There are a few tricks the Panther can still play, but a determined enemy onslaught will exhaust many, if not all, of these defensive manoeuvres.) Destroying AFV in this fashion is not particularly elegant. However, in ASL, as in war, you may have no other option. Considering that a T-34, even one fitted with an 85mm gun, has little chance of penetrating the frontal armor of a Panther, how else can a T-34 skin a cat?
 |
| The Vickers Mark VIB requires a light touch |
A final word, or two, on AFV, and then I will have a quick look at what Light Anti-Tank Weapons (LATW) can bring to the table. Do not get into the habit of parking and shooting. Armored Fighting Vehicles are capable of so much more. Try to squeeze every ton of value out of them. Be careful not to overextend your reach though. Tanks can literally get a shock of their own.
Shock is a condition that results from an inconclusive hit. As game effects go, this is my favourite for AFV. When an AFV suffers a Shock result, it immediately Buttons Up (if CE), and may conduct no other actions for the remainder of the turn. A blue-on-white Shock counter is placed atop the vehicle. The colour scheme is the same one used on a DM counter because, like a DM counter, a Shock counter can only be removed during the Rally Phase (RPh), and then only if certain conditions are met. There are two ways for an AFV to become Shocked, but neither explains why I think that Shock is such a useful game effect. During the RPh immediately following a Shock result, the owning player rolls a die. A third of the time, the Shock counter will be removed, and the vehicle returns to normal, having suffered no long-term effects from the Shock result. More often, the counter will be flipped to its Unconfirmed Kill (UK) side. In this case, the vehicle continues to suffer the effects of Shock, and cannot undertake any action. During the next RPh, another die roll will determine the ultimate fate of the vehicle. Either it will be destroyed, leaving only a wreck, or the AFV will return to the state that it was in prior to becoming Shocked.26
 |
| A shocking good game effect |
I delight in the tension and uncertainty generated by a Shock result. It is a fog-of-war element that compels both players to make decisions based on incomplete information. Do I continue to fire at a Shocked AFV, possibly waste precious AT resources, and delay my advance? Or do I ignore it, and press on? On the far side of the table, my opponent must make some tough choices too. Shift forces to cover a gap in the defence created by the incapacitation of an AFV, or gamble on its recovery? Tough choices are what make ASL interesting. What will you do when faced with a similar situation?
Fist fight
Armored Fighting Vehicles do not have it all their way. Steel dinosaurs flourished in the early-war period when the poor bloody infantry had little but machine guns and the occasional Anti-Tank Rifle (ATR) to defend themselves with. Because ATR can target vehicles using the TH process, or Infantry on the Infantry Fire Table (IFT), I occasionally find it useful to create a “sniper” out of an 8-0 leader. Provided that I can position him where the terrain offers good fields of fire, and plenty of Open Ground, I will arm him with an ATR.
 |
| ...he grinned, before the recoil shattered his collar bone. |
As the war dragged on, new, more powerful LATW were introduced. My favourite is the Projector Infantry Anti-Tank (PIAT). It looks like a gadget that some bespectacled tinkerer devised, right down to the quirky, low-tech cork and chain. It has its foibles. A PIAT lacks the range of the bazooka (BAZ) and the Panzerschrek (PSK) introduced in ASLSK2, its penetrating power is about six percent less than that of a BAZ, and a PIAT is prone to malfunction as often as the earliest American rocket launcher is. But the charm, if you will, is that the PIAT can be repaired, unlike a BAZ or PSK. But its most endearing aspect is that it can be fired from inside a building without fear of Backblast. There is no Backblast due to the way that PIAT worked, which makes it an ideal LATW in an urban environment. Did I mention that a PIAT can also target enemy Infantry in a building? You can try your hand at destroying German assault guns with a PIAT in “Monty’s Gamble.”
 |
| A PIAT delivers an 8 FP attack against a target in a building |
The most feared LATW is the one that you cannot see. Hidden SW aside, the one-shot Panzerfaust (PF) is the deadliest anti-tank weapon on the ASL battlefield. It can defeat the armor of any AFV in the game, and will penetrate even the strongest armor almost 20 percent of the time. A PF is a Shaped Charge Weapon (SCW) potentially available to all German Infantry from October 1943. It is an inherent SW, meaning that it does not exist in counter form. It might be helpful to liken a PF to smoke grenades. In order to place smoke grenades, a squad must first check for availability by rolling a die (dr), and comparing the dr to its smoke exponent. German Infantry do not have a PF exponent. Instead, PF availability is based on unit size, and the time of the war. In 1944, for example, a German squad normally will have access to a PF 50 percent of the time. There are detrimental modifiers for being tired (Counter Exhausted), and for targeting anything other than an AFV. (Hitting an enemy Infantry unit in a building will reward you with a 16 FP attack!) Similarly, each successively smaller unit incurs a detrimental modifier, reflecting the decreased likelihood that a HS or crew, let alone a leader, would have a PF close at hand. The odds of having a PF when you need one increases by about 17 percent in 1945, chiefly because of their relative abundance during the last months of the war.27
 |
| Armored behemoths tremble before the humble armored fist |
The PF is nevertheless a fickle friend. Any original PF Check dr of 6 will pin the unit conducting the Check, or worse, break it if the unit was pinned beforehand. Like most LATW, the PF uses its own To Hit table (above), and has an effective range that increases as the war progresses. A PF is also a Backblast hazard. Fire one inside a building and everyone in your hex eats an unmodified 1 FP attack. Adding more injury to insult, a PF can cause deadly injuries regardless of where it is fired from. A To Hit DR of 12 (or 11 for Inexperienced Infantry) not only misses the target, but also results in Casualty Reduction to the firer. Whoooosh! And a HS vanishes before your eyes. But get it right, bring an armored fist to a gun fight, and watch as enemy AFV are transformed into mangled metal. Enough of my twisted imagery. There are plenty of opportunities in ASLSK3 to create your own cardboard mayhem.
Scenarios
Of the eight scenarios in the Kit, only one features no vehicles. “Joseph 351” is a novel scenario, with three distinct forces of Infantry. A German force is sandwiched between a randomly-determined group of American Rangers and French partisans, and a ragtag collection of escaped Russian prisoners of war. The rearmed Russians are led by an individual known to history only as Joseph 351. The scenario has good replay value, and is also a candidate for team play, with two players playing the Allies, and a third playing the Axis. Notwithstanding the fact that it is an infantry-only scenario, S20 cannot pass for a true introductory scenario. There is simply too much going on. If the nature of the (dual) Victory Conditions does not trip up beginners, one or more of the six SSR may. That said, the scenario does provide a means for players to become familiar with the basic sequence of play before complicating matters with Guns and AFV.
“Clash at Borisovka” is a much better introductory scenario. Although the entire OB consists of nothing but tanks, this scenario does what an introductory scenario should do. It teaches players how to use tanks, not armor in general, just tanks. The Victory Conditions are simple, and no SSR clutter the scenario card. A Soviet tank company, comprised of a mix of ten T-34 tanks faces a pair of Tiger tanks and a platoon of medium tanks. A “dicefest” it may be, but Kevin Meyer’s scenario is an excellent fit for ASLSK3.
The remainder of the scenarios in the Kit are combined arms. One, as noted on the table below, has errata.28 But due to the paucity of anti-tank assets on the American side in “Another Summers Day,” I suggest that beginners leave this one for later. “Sherman Marches West” and “Early Battles” are probably a better place to begin your combined-arms training. In spite of its size, “Last Ally, Last Victory,” is another candidate for aspiring “treadheads.” “Monty’s Gamble” and “Stand for New Zealand” are a bit more complex given their SSR. The former is exciting to play, in part, because the entire British force sets up hidden. I have yet to play the latter, which includes a special rule that simulates the effects of the rising sun on Crete.29 It is one of the more intriguing scenarios in ASLSK3.
 |
| The scenarios of ASL Starter Kit 3 |
Comment
 The inclusion of vehicles has far-reaching ramifications across the Starter Kit rule set. Indeed, vehicles are largely to explain why the ASLSK3 rule booklet runs to 28 pages. I have gone to considerable length to explain a cross section of the material introduced in ASLSK3. There is much that I have not mentioned. Nonetheless, it should be apparent that the third Starter Kit has pushed the series beyond what most wargamers would consider beginner level. Those who relish the ASLSK experience will be thrilled by the level of detail that the third Kit brings to the game table. Others less so.
I expected the Starter Kit series to conclude here. But I was wrong. Still, I could never guessed have what would emerge after the tank dust had settled. My next post takes a look at an oddball ASLSK publication that appeared two years later.
Notes
1. I have stuck with the ASLSK capitalization convention for “Brush.” However, even this is not consistent, as the description—lifted from the ASLSK rule set—in the brush graphic above demonstrates. The exception to the general rule that Brush is always “in season” is during a scenario involving Deep Snow, which transforms Brush into Open Ground. Interestingly, one ASLSK scenario does feature this Environmental Condition (EC), but the scenario is played on a board that has no Brush terrain.
The symbols that ASL uses for Brush remind me of topographical symbols for marsh and tropical grass. ASL has rules for both of these terrain types. Marsh has a unique terrain depiction on ASL boards. Tropical grass is represented by transforming grain into kunai—a type of very tall (≈ 2-metre/6-foot) grass found in southeast Asia—when tropical terrain is in play. Kunai can also represent similar types of vegetation such as elephant grass. Confusingly, kunai is treated very much like Brush, with the same entry costs and hindrance value. Meanwhile, Brush usually transforms into bamboo for scenarios set in the tropics.
2. In ASLSK, a terrain bonus applies to any Rally attempt undertaken by Infantry in a building or woods. In ASL, this -1 Dice Roll Modifier (DRM) also applies to Infantry in certain fortifications, such as pillboxes and trenches.
3. There is the curious case of a steeple in the ASLSK historical module. But I will leave chasing steeples for another post.
4. I copied this passage from the ASLRB2 (B10.2). The text may have been omitted to save space. However, additional information—clarifying other aspects of hills and LOS—has been added to subsequent iterations of the ASLSK rule set.
5. When grain is not in season, it is possible to trace an LOS from one end of board t to the other, a distance of 33 hexes.
6. The HMG fire would have to be directed by a leader. Moreover, the FP would be halved as Area Fire for using Long Range Fire. The FP would be halved again (Sub-section 3.2.2), if firing at unbroken Infantry beyond 16 hexes, effectively treating them as concealed per the ASLRB (A9.4).
7. For instance, the ASLSK TH values include behind-the-scenes adjustments for barrel length.
8. Of course, it is possible for Infantry to occupy the same hex, but different Locations in ASL, and therefore fire at each other. However, a hex in ASLSK has only one “location”—a concept and term not present in the ASLSK rule set.
9. Board u is used in five of the scenarios in ASLSK3, and another 20 scenarios published since 2007, including at least ten ASL scenarios. Board 10, one of the so-called rogue boards from the Squad Leader era, was the first board to employ the half-board concept. Apart from board 46 (ASL Action Pack 2), few such boards, predate board u. Recently, there has been a spate of bipolar geography. See, for example, board 63 (Winter Offensive Bonus Pack 2), board 66 (Winter Offensive Bonus Pack 4), board 68 (Special Ops 5), and the forthcoming board 70 (ASL Action Pack 10). There is something extra special about board 70, but I will discuss it elsewhere.
 |
| Can you spot what is extra special about Board 70? |
10. Although the Italian Cannone da 75/24 light-artillery piece is used (by the “Kiwis”) in scenario S27, neither the L3/35 light tank, nor the Italian M13/40 medium tank, appear in an ASLSK3 scenario. The tanks were probably intended to be used with a scenario published later in Operations magazine, but to my knowledge no “official” ASLSK scenario published to date includes these AFV in the order of battle. A pair of Italian tankettes are featured in RPT54 “An Italian Civil War,” published by Schwerpunkt in Rally Point 6.
11. It is possible for a stack moving with leader at Double Time to proceed nine hexes along a road. In ASL, skiers can exceed this limit if they descend across enough Crest Lines. But for our purposes, nine hexes is a finite limit for Infantry in ASLSK.
12. There is no provision for Overrun (OVR) in the ASLSK rule set. A vehicle OVR is a form of mobile fire attack conducted during a vehicle’s MPh. The target is usually Infantry and/or Guns. The vehicle enters the enemy hex, expending additional MP in the process, and after any ensuing Defensive First Fire, conducts the OVR. A formula is used to calculate the FP of the OVR.
13. Some AC, such as the Soviet Broneavtomobil 20 (BA-20), expend MP as a Truck, symbolized by a pair of white circles behind their MP number. This is a reflection of poorer cross-country capability. No truck-like AC are included in ASLSK3.
14. Each time that a vehicle with a red MP number expends a MP to start (or makes a successful Motion attempt), its owner must make a DR. If the player rolls “boxcars,” the vehicle has suffered a mechanical breakdown and is immobilized.
15. A hull hit results from any TH DR in which the colored die is greater than or equal to the white die. A turret or upper-superstructure hit occurs when the white die of a TH DR is greater than the colored die.
16. In ASL, an AFV is a vehicle that has at least some armor. However, not all AFV have a MA; some have no weapons whatsoever. Conversely, there are numerous unarmored vehicles in ASL that have an inherent MA. There are also a few, rare, NT vehicles in ASL with unorthodox MA. In certain cases, these vehicles may not fire through their VCA. To date, none of these oddities have appeared in an ASLSK publication.
17. Some vehicles, such as the American M3 “Lee” medium tank, have Secondary Armament (SA). A SA is indicated on the counter in the same manner as a MA, but above and in a smaller typeface than the calibre of the MA. Depending on whether the SA is prefixed by a “T” or a “B,” it is turret-mounted, or bow-mounted.
18. A number of uncommon, early-war AC, including Dutch Pantserwagen, and the antique Polish wz-29 “Ursus” (a relic of the Great War), sport hull-mounted MG in the rear of the AFV. These RMG are restricted to firing through the rear hull Target Facing of the vehicle.
 |
| Pantserwagen M.39 "Lynx" |
19. The asterisks following the calibre of some Guns, especially MTR, is not the same type of notice. If you compare the two symbols, you will see that the asterisk denoting a Short-Gun-Barrel is aligned horizontally with the counter. The asterisk directing you to an ordnance or vehicle note is aligned vertically (i.e. points to the top of the counter).
20. Some American AFV, such as the M4A3 (105), have Canister ammunition, which for reasons of simplicity is not available in ASLSK. Canister, indicated by the letter “C” on the back of the counter, is an Anti-Personnel round that fires a cluster of steel balls in an shotgun-like pattern. For example the 37mm round used by the M5A1 light tank (included in the ASLSK Expansion Pack), had 122 ⅜” steel balls.
21. Under certain circumstances in ASL, Infantry may enter an enemy hex during the MPh. However, at present Human Wave, Banzai, SMC Overrun, and Berserk and Disrupted Infantry are not covered by the ASLSK rule set.
22. Unlike Infantry, a mobile vehicle is never held in Melee. The ASLSK definition for mobile is: “A good order vehicle that is neither bogged nor immobilized.” The “good order” part refers to a vehicle that is neither Shocked—including an Unconfirmed Kill (UK)—nor Stunned. The omission of “Mired” in the definition may have been an oversight. However, “Mired” does appear elsewhere in the ASLSK glossary where it is referred to as a “more severe form of Bog (7.6).” Being Mired effectively doubles the odds that a vehicle will become Immobilized.
23. The 3-3-7 half-squad (HS) in the illustrated example could have tried to attack the AC using CC Reaction Fire. But apart from the possibility of failing its PAATC and pinning, it needed to roll “snake eyes” on its CC attack to have any possibility of affecting the vehicle. Had the HS instead rolled “box cars,” it would have been eliminated by what, in ASL, is referred to as “Crew Small Arms” fire. (Refer Sub-section 3.8 in the ASLSK rule set.)
24. The only substantial disincentive for using Bounding First Fire is that a target cannot be Acquired.
25. The exception to this is a vehicle that begins its MPh stopped, and fires before moving to a new hex. And while I am on the subject of exceptions, Gun Duel is not applicable (NA) is ASLSK.
26. Although exceedingly rare, it is possible that a vehicle could suffer a Stun/STUN result while under the effects of Shock. In that event, the vehicle would retain the detrimental effects of having been stunned.
Here is an explanation of the reasoning behind the rule for Shock, as found in the ASLRB2: In the early days of riveted (as opposed to cast/welded) construction, even a MG bullet making a direct hit on a rivet could send it hurtling through the interior to ricochet with deadly effect. Later, as tanks acquired ever-thicker armor in the escalating race to stay ahead of constantly enlarging anti-tank armament, a hit could result in only partial armor penetration but could still cause spalling (fragmentation) in the interior with devastating effects. Regardless of the cause, a non-penetrating hit still occasionally gave an undergunned attacker the chance to finish off a superior foe before it could effectively return fire. Another common occurrence was an AFV’s crew being killed, injured, or stunned—with no visual effect of this apparent to the firer. In such an instance, the firer, not knowing if the target was out of action, usually continued to pump rounds into it until satisfied that it was indeed knocked out.
27. The number of PF available to the Axis player is based on the year in which the scenario takes place, and the number of German squads in the Axis Order of Battle (OB). Prior to 1944, the number of PF shots taken (rather than the number of PF Checks taken) may not exceed the number of German squads in the Axis OB. During 1944, this limit increases to one and a half times the number (rounded down) of German squads, and the limit doubles in 1945. In almost 30 years, I have yet to play a scenario in which the Germans have exhausted their supply of PF.
Perhaps the most underrated “LATW” in ASLSK3 is the man-packed Flamethrower (FT). It will destroy any AFV, regardless of AF, on a DR of eight or less, nine if CE.
28. In “Another Summer’s Day,” German Group 1 should have only one 50mm MTR, not two.
29. The effects of the early-morning sun in S27 are more generalized, yet less pronounced than the rules for Sun-Blindness found in Chapter F (North Africa) of the ASLRB. Keep in mind though that while it is not mentioned specifically in the SSR, the +1 DRM for the rising sun does not negate Interdiction (2.0), because this DRM does not negate First Fire Movement in the Open (FFMO).
 |
| ASLSK3 real estate |