
 |
| The challenging terrain of Burma |
Hidden beneath Nicolas Eskubi’s captivating cover art are ten scenarios, and three of Gary’s latest “broad” boards. Tournament directors and competitive players alike will appreciate the inclusion of extra bid levels for each scenario (for use with the optional Australian Balancing System).2 And I have a hunch that many of you will be intrigued by Gary’s latest cartographic creations ably rendered by the artistic flourish of Charlie Kibler. I will get to the scenarios shortly, but first, a look at the maps.
 |
| Two boards in one |
The topography of Southeast Asia in general, and Burma specifically, is enough to bring a smile to the face of a cardboard cartographer. But if you were expecting maps smothered in jungle greenery, think again. By and large the scenarios in To the Bridge! are set in or near human habitation. And most scenarios take place on or near the coast. While mountains and hills embrace Burma from three sides, a wide central plain runs south from the foothills of the Himalayas to the Andaman Sea. Fragments of these lowlands hug the west coast of the Burmese panhandle as far south as Victoria Point. Vegetation varies according to altitude and precipitation. However, agriculture transformed most of the arable land centuries ago.
 |
| The topography of Burma |
Depending on the season, board 8a/b is either a dusty or muddy frontier town with a distinctive far-eastern flavour. Squalid huts crowd one side of the map, while an imposing governor’s residence, and a Buddhist temple command the high ground. A seasonal stream serves as a rudimentary sewer outside the teak mill, and one gets the sense that the jungle could reclaim the town at any moment.
 |
| Eastern promises |
Board 9a/b is more sedate. It represents an area cleared for agriculture. Dirt tracks—remnants perhaps of game trails—ramble through farmland, connecting worker’s shacks and out buildings. In some respects, the 11” × 16” board is a blank canvas. Unsullied by overlays, the map is a fearsome killing ground.
 |
| A time to till, a time to run |
The last board in the pack is a claustrophobic affair. Second-growth forest appears to have a stranglehold on a rubber or coconut plantation fallen on hard times. But then, the gently undulating terrain, with its poor drainage, was never an ideal spot for such an enterprise. Lines of sight on board 7a/b are limited, worse, if bamboo is in play. Towering jungle cuts the map in two, and bottlenecks abound. It is an untidy and unwelcome landscape—ambush country! I like it.
 |
| Well, up jumped the monkey from the coconut grove... |
 |
| Light bamboo? |
Nor are the Victory Conditions hard to fathom. For the most part, the period covered by To the Bridge! is marked by low-intensity engagements between opposing infantry units. I mention this, because, together with the “PTO-lite” quality of many scenarios, the level of experience required to play To the Bridge! is less than that required for, say, Roads through Rome. It is not that the scenarios are unsophisticated, or entry-level. On the contrary, each is leavened with characteristic Fortenberry nuance. I am confident, however, that the scenarios of To the Bridge! will appeal to most players with an interest in the Pacific Theatre. Familiarity with the Japanese rule set helps. After all, they co-star in every scenario. But do not be intimidated by a lack of experience with Chapter G in general. Only two actions necessitate delving into other sections of this chapter.
The hard-charging Japanese are on the offensive in six scenarios. Commonwealth forces attack in another three. One scenario is a meeting engagement. Below is a map showing the approximate location of each scenario. But why Burma?
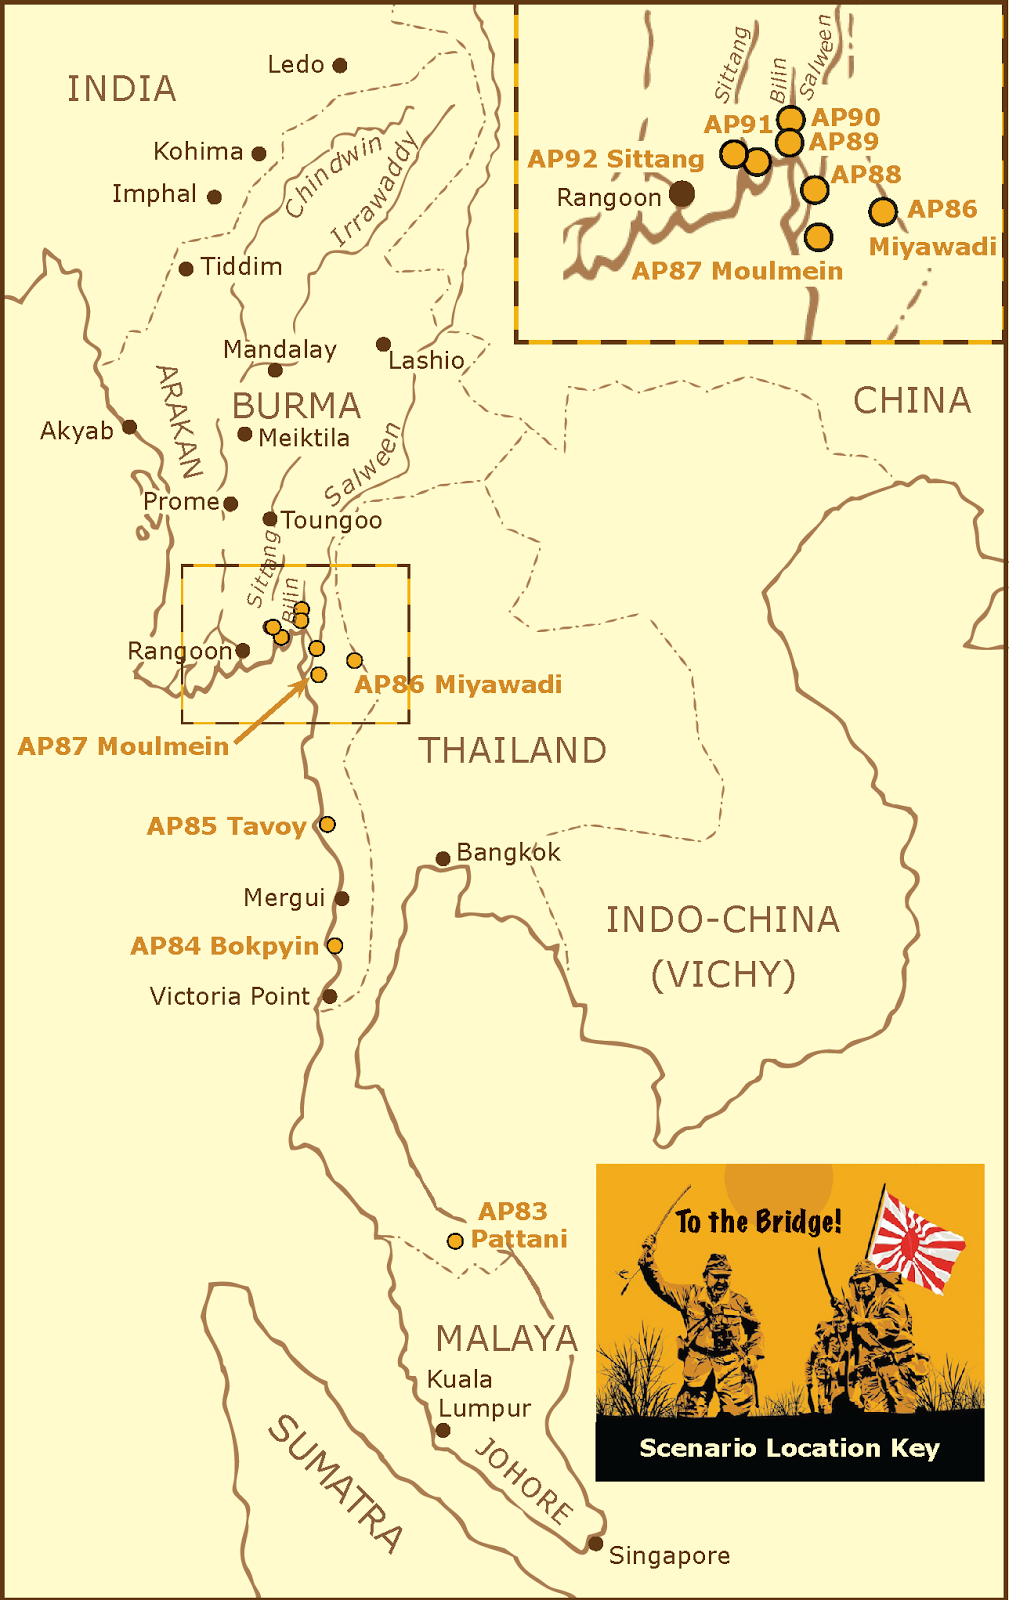 |
| Locations are approximate |
The Japanese invasion of Burma began as a modest affair in December 1941. Lieutenant-General Iida Shojiro’s Fifteenth Army had a straightforward operational objective. Initially, Shojiro’s command was an army in name only. His sharp end consisted solely of the 55th Division, less an infantry regiment. Lieutenant-General Hiroshi Takechi's understrength formation was tasked to secure the flank of Japanese forces operating in Malaya, and capture forward air bases.4 Reinforced by the 33rd Division in February 1942, the focus of the Burma Attack Force, as the Fifteenth Army was designated, shifted as the campaign in Burma took on added strategic importance.5
 |
| The Burma Road was completed in 1938 |
During the 1930s, China gradually lost all of her seaports to Japan. In response, Burmese and Chinese labourers built a tenuous overland supply route from Lashio, Burma to Kunming, China. In 1942, Japanese forces were poised to seize not only Rangoon—the port through which supplies to China entered Burma, but also the western terminus of the Burma Road, as the Lashio-Kunming route had come to be known. By late February, the Japanese were closing on Sittang, gateway to the Burmese capital.
 |
| The 55th was the first Japanese division to enter Burma |
Opposing the Fifteenth Army in 1941 was a potluck of Commonwealth units and formations. On paper, the Japanese faced an understrength infantry division built around an Indian Infantry Brigade. The other half of the 1st Burma Division consisted of a composite brigade recruited from indigenous groups, bolstered by a solitary battalion of British regulars. The division also included two mountain batteries, and two companies of sappers. Supplementary to the 1st Burma Division were seven frontier battalions, and four auxiliary battalions. Six anti-aircraft batteries—half armed with 40mm Bofors, the remainder with 3.7” guns unsuitable for engaging ground targets, and a smattering of line-of-communication troops—some equipped with armoured cars, and carriers, rounded out the defences. Fortunately for the defenders of Burma, the Japanese had a prior engagement.
 |
| Rest and relaxation in Bangkok |
Holiday in Bangkok
Japanese plans to invade Malaya and Burma were premised upon unfettered access to Thai railways, seaports, and aerodromes. Secret negotiations between Japan and Thailand had been ongoing for the better part of a year. The Japanese military did not want to get bogged down in an unnecessary war with Thailand. Tokyo also feared that a military intervention would alert the British to Japanese intentions in Burma and Malaya. Thailand’s head of state, Prime Minister Major-General Plaek Pibulsonggram, did not want a war with Japan either. The Thai dictator had been playing a delicate game of diplomacy for almost a year, seeking assurances from the Western Allies that they would come to his aid if Japan invaded. The Allies offered no such assurances. Phibun, as the Prime Minister was better known, dithered. The Japanese could wait no longer.
On the morning of 8 December 1941, only hours after the attack on Pearl Harbor, the Japanese invaded Thailand. While ground forces breached the eastern frontier from Indochina, the Japanese launched amphibious assaults from a naval task force in the Gulf of Siam. Low cloud cover and light rain reduced visibility as one group made for Bangkok. The remainder struck key centres along the Kra Isthmus.
AP83 Thai Hot
Gary has made a habit of opening his Action Packs with an exotic, “prelude” scenario.6 To the Bridge! continues this practice.
Pattani, a town in the province of the same name, is located on the Kra Isthmus, more than 500 kilometres south of Burma. The town’s proximity to the Malayan border made it a top Japanese priority. As day broke on 8 December, Japanese transports were spotted offshore. Thai forces mobilized in earnest. The local detachment of the Pattani Provincial Force made preparations to resist. But it was units of the Royal Thai Army that posed the gravest threat to Japanese plans. The 2nd Company of the 42nd Infantry Battalion garrisoned Pattani, along with headquarters and support elements. Two platoons from the 2nd Company had their machine guns (MG) trained at the surf, ready to give the enemy a hot reception. Aboard assault boats were soldiers of “Ando” Detachment, 2nd Battalion, 42nd Infantry Regiment, of the Japanese 5th Division. The 2nd of the 42nd was on a collision course with the 2nd of the 42nd.
 |
| Thailand became a Japanese ally in 1941. |
The company-sized, Japanese force in “Thai Hot” is lightly armed, with only machine guns and a pair of ubiquitous “knee mortars” for support. Aside from a few light machine guns (LMG), Japanese support weapons will not be a factor until a beachhead can be secured. Facing down as many as three Thai MG on the first turn will be very unholidaylike. The Japanese player may pray for rain. However, given the distances involved, rain will have to increase in intensity before it can hinder enemy fire. The good news from the Japanese perspective is that their start line is close enough to shore that they can have sandals on the beach as early as the first turn.7 The bad news, from the same perspective, is that the Thai may set up concealed in good, protective terrain—wooden buildings and dense jungle—adjacent to the beach. Admittedly, there is a trade off where dense jungle is concerned. While it provides better protection than nearby huts, dense jungle has a stacking limit of two squads (G2.2), and restricts the formation of fire groups (G.3).
 |
| Shohatsu |
Once ashore, the Japanese have a lot of work to do, or not. And here is the immediate attraction of “Thai Hot.” Gary has fashioned a series of sudden-death Victory Conditions (VC) that can lead to a Japanese victory as early as the end of Turn 3.8 The possibility of a quick win ratchets up the tension, and keeps the stakes high throughout the game. It works like this. The Japanese score a Victory Point (VP) for each objective, as defined in the VC, that they control. There are four objectives. For example, control of the “police station” and the adjacent “customs house” will grant the Japanese one VP. If the Japanese have the requisite number of VP at the end of a particular game turn, the game ends with a Japanese victory. But the Japanese do not have it all their way. They lose one VP for every twelve Casualty Victory Points (CVP) that the Thai amass. Moreover, once the Japanese lose a VP, the game is automatically shortened to six turns.
The arrival of Thai reinforcements on Turn 2 makes the “CVP cap” a real danger. Military youth of the 66th Yuwachon Thaharn, Benjamarachuthisd Military Academy are not especially menacing, represented as they are by Conscripts. Elements of a Heavy Weapons Company are another matter. An HMG, a pair of infantry guns, and an anti-aircraft truck are clearly dangerous additions to the Thai order of battle.9 Their scheduled arrival is a temptation for an aggressive attacker. Unlike the “Phibun Youth,” which enter from the west, the heavy weapons sections must arrive by way of the “shore road” on the south edge of the map. Mounted in trucks, these Thai reinforcements are quite vulnerable to small arms fire. What would you do as the Japanese to counter this threat?
 |
| PTO Terrain (G.1) is in effect, but roads and bridges remain |
The battle was not going well for the Japanese.10 However, by midday Phibun had lost his nerve, and ordered his armed forces to stand down. Failed his Personal Morale Check, I guess. Try not to fail yours when things get hot.
AP84 Double Trouble
Within days of gaining passage through Thailand, Japanese forces were probing southern Burma. On 12 December, 2nd Battalion, 143rd Infantry Regiment, 55th Division crossed the Kra Isthmus. The Regimental Commander, Colonel Uno, and one rifle company led the way, and seized the abandoned airstrip at Victoria Point on the 14th. By Christmas, a company-sized advance party under Lieutenant Furutuki had travelled by sea and taken the police post at Bokpyin, a coastal settlement roughly 150 kilometres to the north. A counterattack on Boxing Day was thrown back, with significant casualties to both sides. The same day, the 2nd Battalion of the Burma Rifles (stationed in Mergui) dispatched reinforcements southward. The rifle company arrived in Bokpyin two days later. Supported by a gunboat and a 3-inch mortar, C Company put in a spirited attack.
 |
| Emblem of the Burma Rifles |
The 55th Division was activated in Japan in August 1940. Two of its infantry regiments were assigned to the invasion of Burma, arriving in Indochina in December 1941. Unlike the veteran 5th Division, the 55th does not appear to have had combat experience prior to its commitment to Burma.11 By 28 December, however, there was no question that men of the 2nd Bn, 143rd Regt at Bokpyin had been well and truly bloodied. So bloodied were they, that three squads in AP84 begin the game Step-Reduced (G1.11), and one of the Japanese officers is wounded (A17.) at start. Adding insults to injuries, the Japanese force is low on ammunition (A19.131), and split in two. One platoon is hunkered down along the shore of the estuary. Two battered platoons are dug in around the hillside police post.
 |
| Roads exist, and there are no huts on board 5a. |
The Burma Rifles were recruited from among the many indigenous peoples of Burma, and led by British officers. When first raised, recruits were drawn mainly from among the Karens, Kachins, and Chins. Burmans “were considered unsuitable for military service, as being neither loyal nor martial enough.” However, later expansion and political pressure led to the recruitment of some Burmans. According to one British veteran, most Burmans “proved unreliable and even treacherous when put to the test of battle.” To be fair, Burmans resented the British presence in their homeland more than most. According to the same British officer, the 2nd Battalion suffered some desertions as a result, but those who remained were “steadfast.”12
 |
| A young rifleman on the eve of war |
Steadfast or not, Gary has chosen to represent the Burma Rifles as a Second Line unit, with an Experience Level Rating (ELR) of two. Although susceptible to Cowering (A25.45), the natives are in the care of four leaders. And despite their second-line status, the sepoys are just as competent as their officers when it comes to firing the company’s 2-inch mortars. In addition to several MG, the Commonwealth force can rely upon the impressively steadfast firepower of an offshore “gunboat.” During the battle, a gunboat provided welcome fire support. Gary has utilized an infrequent Scenario Special Rule (SSR) to model the participation of this riverine boat in battle.13 In my view, the SSR does an excellent good job of mimicking the direct and indirect fire support that was available historically. For ease, the gunboat cannot be targeted during play, and all fire from weapons aboard the vessel are traced from the same, onboard hex.
 |
| Banking on offshore fire support in AP84 Double Trouble |
The timing of the Japanese offensive coincided with the Burmese dry season, prime campaigning weather. Consequently, the jungle is tinderbox dry. Mindful of this, Gary has prohibited Kindling (B25.11). Japanese white phosphorus (WP) rounds pose a small risk of igniting an inferno.14 This possibility is offset by a multitude of paths and roads that provide the attacker with numerous lines of approach.
Commonwealth forces win if they control all buildings at game end. Failing that, they must accrue at least five more VP than the Japanese do. Each side earns CVP normally. Victory Points are also earned for each building hex that is not a hut (G5.).
I have a hunch that this tourney-sized scenario will prove popular. Granted the Japanese are permitted to set up ten percent of their force hidden per G1.631, but an SSR neatly sidesteps the potential for a “bug hunt.” Any Japanese units that remain hidden at the beginning of Japanese Player Turn 4 must conduct a special Banzai Charge (G1.5)—no conjuring a half-squad out of thin air on the next to last turn.
In spite of their inexperience, the sepoys of C Company reclaimed Bokpyin. Within a week they had rejoined their parent unit at Mergui. Other battalions of the 2nd Burma Brigade would fair less well in the coming days.
AP85 Slicing The Throat
Men of the 3rd and 6th Burma Rifles were about to experience their baptism of fire. The Japanese were coming. They were coming not from the south, but from the east.
British plans for the defence of Burma and Malaya were partly predicated on the ability of the Royal Air Force to maintain air superiority, and to interdict Japanese ship and troop movements. Indeed, until 1941 the RAF was primarily responsible for the defence of the British Far East, with the army relegated to guard duties at air and naval installations. In the Tenasserim district of Burma—a slender strip of land sandwiched between the Andaman Sea and Thailand—priority was given to the construction of aerodromes. The most important landing strips in the district were located at Moulmein, Tavoy, Mergui, and Victoria Point.
 |
| Royal Air Force aerodrome in Burma circa 1941 |
Generally speaking, roads in the Tenasserim were bad. The only all-weather routes ran north south. Below Moulmein, only intermittent mountain tracks headed east toward Thailand. Even the road from Moulmein to the Burmese frontier post at Miyawadi was interrupted by an 80-kilometre stretch that was reportedly little better than a track. However, Major Oki, commander of the 3rd Battalion, 112th Infantry Regiment was a determined fellow. While the 2/143rd still held Victoria Point, Major Oki and his battalion departed Bangkok on 3 January. The target was the seaside town of Tavoy.15 The purpose of the tortuous trek was to cut the Tenasserim in two.
 |
| Elephants in Japanese service in Burma |
Engineers were in short supply in Burma during 1941. Most were detailed to build air bases and improve lines of communication. None could be spared for the construction of stout defensive works. What field defences there were when the Japanese invaded, were little more than figurative speed bumps, designed to slow rather than halt the enemy. This is borne out by the lack of fortifications provided in the Commonwealth OB of AP85. A single roadblock in the British OB seems a paltry substitute for proper fieldworks. And if anyone desperately needed fortificatons, it is the ragtag bunch assigned to defend Tavoy.
The 3rd Battalion, Burma Rifles was one of the regular (Kachin) battalions transferred from the Indian Army command in 1937. On 27 December 1941, the battalion became part of the 2nd Burma Brigade Group, and two of its rifle companies were assigned to the garrison at Mergui. In mid January, with the threat to Tavoy now apparent, these companies were transferred north by sea. Arriving at 1800 on 17 January, C Company left Tavoy with men of the 6th Burma Rifles for a blocking position near Kyaukmedaung, some 25 kilometres northeast of Tavoy. That evening the Japanese struck. Second-in-command of the 3rd Burma Rifles, Acting-Major V.A. Chiodetti, was killed in the fighting, and the defenders dispersed.16 The way to Tavoy lay open.
 |
| The regional airport at Tavoy (Dawei) today. |
The remaining companies of the 3rd (two companies) and the 6th Burma Rifles (one company) held the town. Their numbers were strengthened by a detachment of the Kokine Battalion, Burma Frontier Force (BFF) guarding the aerodrome, and the Tavoy Company of the Tenasserim Battalion, Burma Auxiliary Force (BAF). The Kokine Battalion was raised in October 1940, as the need for additional aerodrome security units increased. Detachments of this battalion were stationed at Victoria Point, Mergui, Tavoy, and Moulmein in December 1941. Within the BFF, the policemen of the Kokine Battalion arguably had the least training, and the poorest equipment. The Tavoy Company of the Tenasserim Battalion was little better. It was effectively a militia, with three months of formal military training, called out in an emergency. Not surprisingly, “Slicing the Throat” contains a good deal of tan-coloured, Green units (A19.2). The pick of the OB litter is probably the pair of carrier “crews” from the headquarters of 2nd Burma Brigade, and a lone MMG.
 |
| Universal Carrier - Carrier A British Vehicle Note 64 |
Considering the sad-sack state of the defence, the Japanese might appear to be the scenario favourite. To win, however, the attacker must destroy the enemy, seize buildings, and keep Japanese casualties to a minimum. Each building Location is worth one VP to the side that controls it. I count 47 building Locations. Each side is also awarded CVP normally. That is a lot of ground to take. Crossing ground is always a tricky business for the Japanese. They have an irritating habit of withering away during the course of a scenario.
The Japanese have a reinforced rifle company at their disposal, including a typical allotment of MG and light mortars. However, the most powerful weapon in the Japanese arsenal is a mountain gun. It is a bit of a puzzler. Lines of sight are limited, and only extra elbow grease will get it forward in time to have a significant impact on the battle. You may want to keep the C10.3 Gun Manhandling Table close at hand. Major Oki had his men to hand carry artillery rounds from Thailand for a reason.
 |
| Year-41 Type Mountain Gun - Japanese Ordnance Note 11 |
Tavoy bears a striking resemblance to Pattani. But on the west side of the Kra Isthmus, brush is, well, brush. The forest is drier and less dense, and the town is not as shabby as its Thai look alike. Due to zoning restrictions, there are no huts within town limits either. There is nevertheless plenty of cover to be had.
Both sides have concealment counters at start. Aside from some anticipated subterfuge, concealment and the close-in nature of the terrain are a recipe for ambush. The entire Japanese OB is Stealthy. Almost half of the Commonwealth force is Lax. The lines are so close that if the defenders are not careful, the Japanese could be slitting throats on the first turn. And then there is the threat of a Banzai Charge (G1.5). Small wonder there is a stipulation in the SSR that a minimum number of Commonwealth squads must begin play on board 7a. At least there is no requirement to put them on the front line.
 |
| AP85 Slicing the Throat board configuration |
The Japanese stormed the airfield at 0900, encountering some stiff resistance initially. However, by mid afternoon they had flushed the defenders from town. Survivors of the Tavoy garrison made their way north to Moulmein in small groups. From the two companies of the 3rd Burma Rifles at Tavoy, only 30 Chins, led by Subedar Sima Zam, returned to duty.
AP86 Milling About
While Major Oki’s men secured Tavoy, a sister battalion of the 112th Infantry Regiment made preparations to cross the Burmese frontier in strength. Before sunrise on 20 January, a platoon of Gurkhas garrisoning the border village of Miyawadi was caught unawares, and quickly scattered by a large force of Japanese. The surviving Gurhkas scrambled back to D Company’s main position atop hills some two miles to the rear. The Japanese followed. By mid morning, the enemy had enveloped the Gurhka company, and ammunition began to run low. Then the telephone line was cut.17 The Commanding Officer of the 1st Battalion, 7th Gurkha Rifles, Lieutenant-Colonel White, cobbled together a relief force from three different units, and personally led it forward. The column ran headlong into the lead elements of the Japanese 1/112th.
I am dead certain that AP86 will be found milling about game tables this year, and next. It is a firecracker of a scenario, a fluid contest from start to finish. The action unfolds on 20 January 1942, near the frontier town of Miyawadi. Two vanguards collide. The colonial forces need to break contact, fallback, and form successive lines of defence in a frantic effort to stem the red-striped tide. At the same time, the emperor’s finest need to push hard, turn a flank, and if circumstances permit, bolt for the board edge. This is the meeting engagement at its finest. Simultaneous set up, adjacent set-up areas, and complete concealment guarantee that tough decisions will need to be made the moment the wind dice drop.
 |
| Wind-change dice ;) |
At the risk of dissipating some fog of war, I would like to describe the opposing forces, and the difficult terrain opposing them. I was about to suggest that I begin with the underdogs. But I am not sure who that would be. So instead, I will begin with our special guests, the Burma Independence Army (BIA).
“Army” is a grand term for a Japanese-sponsored guerilla force.18 Still, it was the title adopted by a fraternity of Burmans and Shan in the dying days of 1941. The small coalition of radicals had big plans for the future of their country. They were encouraged and aided by an officer on the General Staff of the Imperial Japanese Army (IJA). Colonel Keiji Suzuki believed in their dream of an independent Burma. The General Staff shared neither the group’s political aspirations, nor Colonel Suzuki’s genuine support for them. The IJA nevertheless recognized the advantages of anti-British subversives.
I do not want to overstate the significance of the BIA in Japanese plans and operations. The IJA did not expect much from these irregulars. In fact, the General Staff had an eleventh-hour change of heart, and attempted to recall the main dissidents to Tokyo. Colonel Suzuki fabricated a story that the situation was out of his hands. The insurgents, he told his superiors, were already deep in the Siamese jungle, and well on their way to Burma. Not surprisingly, the headquarters of the Fifteenth Army had only a vague idea of the BIA’s role in the coming invasion, believing it to be primarily an intelligence operation designed to harass enemy rear areas. However, a good deal of that role turned out to be administrative. On 14 December, for example, a BIA team requisitioned vehicles to transport Colonel Uno’s column to Victoria Point. And once Major Oki’s force had captured Tavoy, a BIA detachment under Captain Kawashima installed a civil administration, and began recruiting Burman townsfolk.19
 |
| Burma Independence Army |
Japanese commanders in the field had mixed feelings regarding the presence of BIA detachments. For instance, during the campaign, Colonel Suzuki recalled the Kitajima Unit from the 55th Division. Suzuki believed the attitude of the divisional commander toward this BIA team to be counterproductive. Pragmatic junior officers were more likely to capitalize on the skills and expertise of BIA cadre attached to their sub units.
Interpreters and guides with local knowledge of the countryside were too important to pass up. Small bands of Burmese were invariably attached, either formally or informally, to Japanese advance guards. Given that the IJA lacked proper maps of Burma, information provided by defectors was likewise a boon to Japanese combat leaders. The BIA depicted in “Milling About” are possibly a mix of the cadre formally assigned to the 55th Division, spur-of-the-moment recruits, and perhaps a few deserters.20
There is nothing to prevent the Japanese player from using these irregulars for reconnaissance. But this would be a waste of their special abilities in AP86. The BIA are treated as Partisans (A25.24), and are modelled as guides. In scenario terms, this is accomplished by allowing the BIA, and any accompanying Japanese, to move more quickly through dense vegetation. The normal cost to enter jungle, brush, or kunai with a BIA unit is 1.5 Movement Factors (MF) per hex. The BIA are aided in their assignment by being able to Deploy (A1.31) freely during setup. This last ability is key. It allows up to five Japanese stacks to benefit from the reduced MF costs enjoyed by the BIA. Be mindful, however, of the reduced stacking limits, which still apply in dense jungle that does not contain a road (G2.2). Yes, dense jungle is in effect. It is Inherent Terrain (B.6). As a result, there are only eight hexes capable of being Bypassed during the game, all of which contain huts (G5.). The other thing to remember is that this is one of those rare occasions when the Japanese have an onboard ally. Because the rules for Allied Troops (A10.7) apply by default, a BIA unit stacked with a Japanese 9-1 leader effectively has an unbroken Morale Level of eight.21 You can begin to appreciate the importance of the BIA in any Japanese game plan.
The BIA have the added benefit of being able to form multi-Location fire groups (FG). While not a big deal considering the limitations imposed on such FG by PTO Terrain, the capability may come in handy. The BIA are of no assistance, however, should the Japanese decide to play steeplechase and vault the cactus hedge in play.22 That is not entirely true. If the Japanese heeded the advice of their BIA advisors, they would avoid the “hedge” like the plague.
 |
| B9.7 Cactus Hedge - a prickly proposition |
The cactus hedge in AP86 actually represents an enclosure used to protect livestock and their owners from large predators, including the two-legged kind. Villagers commonly built these structures from thorny scrub, or similar vegetation that would deter intruders. In some cases vegetation was planted deliberately. Most often it was simply collected and shaped into a barrier. At night the entrance was sealed. In the wild Dawna Range of the Tenasserim this was a prudent security measure. The cactus hedge will not stop the Japanese in AP86. But it will make them think twice about the direction of their advance.
A cactus hedge (B9.7) is any hedge (and/or wall) that has been so specified in an SSR. It is treated the same as a regular hedge except with regard to movement. In “Milling About,” the special nature of a cactus hedge will only come into play during the Movement, Rout, and Advance Phases (MPh, RtPh, and APh). During the MPh, any unit that crosses a cactus hedge may only do so by means of a Minimum Move (A4.134). This has several repercussions for the moving unit. First, the unit can only move one hex. Once it traverses the cactus hedge, it may move no farther that turn, with one exception that I will get to shortly. Second, provided it remains unbroken following any Defensive First Fire (DFF), the unit is automatically pinned. Even Japanese Single Man Counters (SMC) will pin in this situation. And third, the unit becomes Counter Exhausted (CX), even if it was CX at the beginning of the MPh. Should a unit break after crossing a cactus hedge, it may rout normally during the RtPh. However, any unit that routs across a cactus hedge must use Low Crawl (A10.52). Finally, Advance versus Difficult Terrain (A4.72) applies to any unit that wishes to cross a cactus hedge during the APh. A CX unit may not advance across a cactus hedge, and any unit that does becomes CX.23
My apologies for the long-winded explanation. However, I feel that it is important, especially for less experienced players, to understand the implications of crossing a cactus hedge before you begin play. Discover them after you leap the hedge, and you could find yourself in a very prickly situation indeed.
 |
| B9.7 Cactus Hedge - the real deal in Eritrea |
A firm grasp of the cactus hedge rules is a must for the Japanese player. The hedge borders the forward edge of the Japanese set-up area. Breaching the enclosure with a “suicide bomber” would be a neat trick, if an SSR permitted it.24 But I am sure that the Japanese will find a better use for their demolition charge (DC). I will expand upon the DC in a moment, but first a quick overview of the Japanese force.
At Bokpyin and Tavoy, the Japanese are assigned an ELR 3. My hunch is that Gary used this level because the Japanese company (2/143rd) at the police post had been weakened significantly by an earlier attack. True, the Japanese force at Tavoy had been in a couple of smaller engagements prior to the assault on the town. However, I think that the ELR of 3/112th has more to do with the trying route march from Thailand. The 1/112th at Miyawadi shared some of these hardships, as they approached the Burmese frontier on foot, over very steep terrain. But their journey was not compounded by illness, or a shortage of rations, as that of the 3/112th was. These differences in combat fitness are reflected in the assignment of a higher ELR to the 1st Battalion.
The composition of the Japanese company in AP86 is similar to that at Tavoy, less the mountain gun. A dozen First Line squads, with a typical complement of LMG and light mortars, are supported by an MMG, and led by three subalterns. The odd men out are a supernumerary Infantry crew. I am tempted to conclude that this spare 2-2-8 is meant to be paired with the DC to form an ad hoc demolition team. Keeping in mind that a crew may not create a DC Hero (G1.424), the main advantage of arming the crew with a DC is that it has an increased chance of reaching its target and placing the explosives. But if a delivery man with a high morale is desired, the 9-0 leader seems like a better candidate for the job. I also doubt that the extra crew is redundancy for the MMG. These weapons have a habit of malfunctioning and disabling long before their manning crew is eliminated. No, I have a suspicion that the crew has something to do with the endgame, something I will elaborate on at the end of this section.
 |
| G1.424 Suicide Bombers and Suicide Squads |
The colonial OB in AP86 is a jumbled mix of eleven squads of varying quality and ability. They represent a company from the 1/7th Gurkhas, and a platoon each from the 1st Battalion, 9th Royal Jats Regiment, and the 4th Battalion, The Burma Rifles. With their superior morale and unique talents, the Gurkhas (A25.43) are unquestionably the backbone of the relief force. They may, however, be a bit too supercharged for the period. The 16th Indian Infantry, of which the 1/7th Gurkhas and 1/9th Jats were a part, had only arrived in Burma a month earlier. The general standard of training was apparently not good, and the brigade had no experience operating in jungle terrain. Consequently, I am not sure that the Gurkhas deserve an ELR 5, or an underscored Morale Level (A19.3), at this stage of the Burma Campaign.25 That said, Gary sensibly split the difference when he assigned the Jats and the Burma Rifles the same ELR. In spite of their real-world differences, the added bookkeeping would not be worth the trouble.
The three leaders in the Indian force, while not mediocre, are hardly stellar. Together with the few weapons in colonial hands, average leadership is a good counterweight to the seven 4-5-8s in the Commonwealth OB. The MMG begins play dismantled. So the Bren guns will need to do the heavy lifting, as the Indians attempt to fallback in good order. The lone light mortar could prove important, if it can provide a smoke screen for the withdrawal. But it too begins play dismantled. Truth be told, the terrain is more likely to slow the Japanese than any combination of Bren and rifle fire on Turn 1.
 |
| 16th Independent Indian Brigade 20 January 1942 |
The Moei River separates Miyawadi from the Thai settlement of Mae Sot. The terrain rises sharply from the river, and a few kilometres west culminates in a series of hills where the bulk of D Company, 1/7th Gurkha Rifles was positioned. Between these hills and the heights of the Dawna Range father west was a valley cut by the only motorable road connecting Miyawadi to Moulmein. Japanese advance elements had barely descended into the valley when they bumped into the largely Indian relief force travelling in the opposite direction.
 |
| AP86 Milling About aka Miyawadi Mix-up (VASL) |
 |
| AP86 Milling About aka Miyawadi Mix-up |
The first thing that strikes me about the playing area is the denseness of the ground. Thankfully, bamboo is not in play. No roads exist save the main one running north to south. All other brush-roads and “jungle-roads” are paths (B13.6). And for those new to the PTO, no paths exist in the palm tree hexes (G4.1).
As you can see from the map, the cactus hedge is one continuous wall of green enclosing an area of kunai. Walls to the north and east remain, however. Although it would have been in keeping with historical practice to transform all walls into cactus hedges, those in the north would have become a death trap for the Indians. Play testing confirmed this. Historicity concerns aside, the primary reason for the presence of cactus hedges in AP86 is to prevent the Japanese from breezing past the colonials on Turn 1. The reduced stacking limits of dense jungle—which also apply to movement along paths, and the restrictions imposed on movement by the cactus hedge, go a long way toward to keeping Japanese ambitions in check. [Edit: (27 May 2014) In the event that both sides share the G14-15 cactus-hedge hexside at start, Perry Cocke of MMP has ruled that the side moving second receives Wall Advantage (WA). Although this appears to contradict B9.322 and step 1.32B of ASOP, Perry's ruling probably makes sense given the situation depicted in AP86.]
Before I forget, I wanted to remind newer players that dense jungle has a +2 Terrain Effects Modifier (TEM), although -1 TEM still applies for Airbursts (B13.3). Lines of sight are quite restricted though, and the light mortars are not a big threat. Depending on the situation, dense jungle may be a better place to be than a hut, which brings me to my next point.
All buildings, even stone ones, are huts. Building K7 may have presented a problem, but Gary avoided this by ruling out the presence of an upper level. For all intents and purposes, this multi-hex building is treated just like a hut. This includes making it single storey for LOS and Hindrance purposes (G5.2), not unlike palm tree hexes.
 |
| G5.8 Huts on stiltoids |
Now that we have had a detailed look at the opposing sides, and the terrain over which they must fight, it is almost time to determine who has the initiative. Set up is simultaneous—with a spare board placed between opposing forces, and a die roll decides which side moves first. The die roll is the easy part. Set up, not so much.
Both sides are permitted to begin play concealed, regardless of terrain. Concealment is a good fit for this scenario because it removes part of the advantage afforded to the player who goes first. It also encourages movement over fire. The tricky part is trying to anticipate what your opponent’s dispositions will look like when the curtain, or in this case the board, goes up.26 Another hurdle to overcome is trying to commit the playing area to memory before placement of the screen. In a friendly match, I would have no difficulty with a duplicate board placed to one side for reference during set up. In a tournament setting, however, memorizing the lay of the land is part of the pre-game sequence, a kind of Kim’s game within the game.
There are a number of other considerations that need be taken into account while setting up, not least the VC. But let’s begin with the limitations imposed on each force at start. The MMG and mortars in each OB begin play dismantled. Therefore, we can be fairly confident that neither side will be subjected to a whithering rate-of-fire tear on the first player turn. Nor will either side be able to smoke off a key position. And both forces will be reluctant to forfeit concealment by assembling these key weapons while in enemy LOS. But the Japanese have bigger problems.
The Japanese, including the BIA, may not set up more than two Multi-Man Counters (MMC) per hex. Due to the dense jungle, this obligatory dispersal prevents the formation of large FG. The stacking limit also prevents a large stack of Japanese moving with BIA assistance on the first turn. In other words, the Japanese need to spend their first turn reorganizing. Should the Japanese win the coin toss and go first, they are confined by two other restrictions: they may not use Double Time, and they may not conduct a Banzai Charge. The scenario is only five-and-a-half turns long, and the Japanese have no time to waste. Their best chance for victory lies in exiting units off the north edge. However, there is more to the VC than this.
The VC are designed to compel the Japanese to take the offensive, regardless of who draws first blood. At game end, the Japanese must have six VP more than the British have. Casualty Victory Points are awarded normally, with two exceptions. The first exception has to do with the way Japanese leaders are modelled in ASL. The second is mandated by the VC.
The CVP value for an eliminated Japanese leader is based on the side that is currently face up. Put another way, unless a Japanese leader is killed out right, the most that the British player will receive for eliminating a (wounded) 9-1 leader, for example, is one CVP (G1.65). The Japanese may also amass Exit VP by exiting off the north edge of the playing area. Each Japanese (and BIA) unit that does so earns twice the normal Exit VP (A26.23). Thus the incentive to get forward quickly and exit. However, the Japanese do not receive credit for any prisoners that exit with them.
 |
| No surrender, no voluntary break |
I had planned to use this scenario as a talking point for prisoners in scenarios starring the Japanese. Those of you who have watched games in progress may have noticed that the Japanese are not big on captives. While true to some extent, like most things in ASL, it depends. It depends on two things, the date of the battle, and whether or not No Quarter (NQ) is in effect (A20.3). An SSR may dictate that NQ is in effect, or it may be invoked during play. In the case of AP86, NQ is not is in effect when play commences. More important, and this applies to the entire period covered by To the Bridge!, both sides may take prisoners (G1.621).27
The only way to take Japanese or Gurkhas prisoner is to capture them in Close Combat (CC) per A20.22. (Gurkhas and Japanese will always use Low Crawl, or risk Interdiction when faced with a situation that normally would require them to surrender. If unable to rout, they are eliminated instead.) It is not easy to capture Gurkhas in CC, and is seldom attempted unless the Gurkhas have been ambushed, or are broken in Melee. This is likewise true of Japanese Personnel, but is complicated by the tendency of Japanese soldiers to commit suicide in order to avoid capture (G1.641). There is a practical reason for committing harakiri where ASL is concerned. Prisoners are worth more. The value of a squad eliminated during play is 2 CVP. The value of the same squad to a captor at the end of a scenario is 4 CVP (A20.1). Self-destruction therefore makes economic sense when CVP form an important part of the VC. It also makes sense because, once captured, Japanese prisoners will not attempt to escape (A20.55; G1.621).
Returning to the specifics of AP86, the non-Gurkha units in the Indian OB are the most vulnerable to Japanese predation. Indeed, when I first looked at the VC, I feared that the Japanese would attempt to capture any HS deployed forward as speed bumps. Because the hapless First- and Second-Line units in the Commonwealth OB will, if cornered, surrender to the enemy, the Japanese have the potential to earn CVP much easier than their opponents can.
However, the more I read the VC, the less relevant prisoners appeared. Aside from gaining style points for taking a Japanese unit prisoner, and beyond any momentary tactical advantage, there is no long-term value to taking prisoners in AP86. Simply put, no CVP are ever awarded for them, dead or alive.
 |
| Preferably dead |
The part that had me flummoxed was the italicized exception in the following sentence: “CVP are awarded normally, and the Japanese also earn double Exit VP [EXC: prisoners do not count] for units (including BIA); see SSR 3) exited off the north edge.” The exception is more nuanced than I had realized. Proximity to the Exit VP clause made me think that the exception applied only to Exit VP. Hence my concern that the Japanese could collect prisoners like so many Easter eggs. But there is no CVP payoff for taking prisoners. They are literally worthless once captured. Nor will a prisoner eliminated by its own side earn any CVP either (A26.222).
 |
| No cheques, no quarters... How about CVP? |
So where does this leave us? With a bit of dilemma for the Japanese, it would seem. Judging when to reject a surrender and invoke NQ could be significant. Too early, and the Japanese could miss an opportunity to eliminate a large stack of broken units later on. Would you accept a prisoner and forgo a CVP early in the hope of capitalizing on a more lucrative failure-to-rout situation later? Or would you go for the sure thing?
Each side in AP86 has its strengths and weaknesses. Identifying the best means to achieve victory as the situation develops will be an ongoing effort. Players need to be flexible, not wedded to a plan. Expect an eventful and topsy-turvy game.
The opposing columns collided on the road to Miyawaddy. In the ensuing skirmish, the brigade intelligence officer accompanying Colonel White was killed. Then the commanding officer went missing. Failing to make any progress, and believing that D Company was beyond help, the relief force disengaged. Most fell back to the hamlet of Thingannyinaung, where they established a temporary blocking position. Others, including Colonel White, reappeared from the jungle as far back as Sukli, ten kilometres to the rear. Meanwhile, Captain Eric Holdaway had managed to extricate D Company from its predicament. Leaving their vehicles behind, Holdaway’s Gurkhas struck out northwest over the forested hills. They rejoined their battalion at Martaban, on the far side of the Salween, having travelled down the river on commandeered sampans. Although disaster had been averted at Miyawadi, the 16th Brigade’s plans for the defence of the Kawkareik Pass had begun to unravel.
 |
| The scenarios of Action Pack 9 |
Notes
1. Dave Ramsey’s ASL Archive boasts more than 6000 scenario titles. However, a good number of these scenarios have been published more than once. As of 7 January 2014, Avalon Hill (AH) is credited with 338 scenarios, while MMP has published 660, a handful of which predate MMP’s stewardship of ASL. On the surface, it appears that MMP has averaged about 40 scenarios per year. However, MMP has republished/re-released many old AH titles from The General magazine, the ASL Annual, and Classic ASL, not to mention the core modules, and Squad-Leader conversions. Therefore, the true number of “official” scenarios (including “officialized” third-party work such as Out of the Bunker and Best of Friends) is still far from the 1000 mark.
2. The handicap system provides a means for players of unequal abilities to balance a scenario more closely by weakening the side played by the stronger player. This balancing mechanism is more frequently used in competitions where players will give up (i.e. bid) certain advantages in order to play a preferred side. For a full explanation of ABS, see my earlier post.
3. Huts (G5.) are in play for only five scenarios, while two hexes are treated as swamp (G7.) in six scenarios.
4. This might seem a bit of a reach for an understrength infantry division. However, keep in mind that the forces allocated for the entire South Pacific offensive in December 1941 amounted to just eleven infantry divisions. The Japanese nevertheless conquered the Philippines, Hong Kong, Malaya, Singapore, Borneo, the Dutch East Indies, most of Papua New Guinea, and a host of smaller Pacific islands in less than six months. By mid 1942, the Japanese Empire encompassed an area more than seven million kilometres square!
5. Some have suggested that a third reason for Japanese interest in Burma was the possibility of using the country as a springboard for an invasion of India. I am skeptical. Initial Japanese plans did not even call for the complete capture of Burmese territory. Moreover, the 1944 foray into India was arguably a limited Japanese offensive designed solely to cut off and destroy British formations at Imphal. The invasion of India proper was probably never a serious consideration.
6. In A Decade of War, Gary treated us to a sizeable tin-can scenario set in Spain during the Civil War. His sophomore pack opened in Tunisia with a dust up between an American combat team, and a German motorized column—with a pair of Italian armoured cars along for the ride.
7. The Japanese timetable can be become unstuck if a boat runs aground in the shallows (G12.21), or is immobilized (G12.601) before beaching (E5.23). Because the Beach Slope is Moderate (G13.4), OCEAN hexes within two hexes of the Beach are considered shallow.
8. This type of VC is old hat for Gary. A number of scenarios in A Decade of War (e.g. AP56 “Quagmire” and AP60 “Nishne Nyet!”), and Roads through Rome (e.g. AP79 “Rude Mood” and AP82 “Coriano”) employ a variation of this sudden-death mechanism.
9. A French Camion de Mitrailleuse Contre-Avions is used to represent the Thai anti-aircraft truck. It is quite possible that the Thai captured some of these in Indochina during the frontier battles of January 1941. Gary has used the 7.5cm leIG 18 (German Ordnance Note 15) for the Thai mountain guns that the Japanese encountered during the battle. He felt that it was the best choice among the guns found in the Axis Minor counter mix. I have my suspicions, however, that the artillery pieces in question were actually Krupp Model 1908 mountain guns. The Thai purchased a small number of these from Germany. They apparently acquired far more from Japan during the 1930s. In Japanese service, the Krupp M1908 is known as the Year-41 Type Mountain Gun (Japanese Ordnance Note 11).
10. The Thai battalion commander was apparently killed in the fighting. According to one source, 23-other ranks, five police officers, four army youth, and nine civilians were killed before the cease fire.
11. The 144th Infantry Regiment served in Guam and Rabaul, before being destroyed in New Guinea. In 1943, after being rebuilt, the regiment rejoined the 55th Division in Burma, where it remained until war’s end. As an aside, the Imperial Japanese Army normally did not include the descriptor “infantry” when referring to their infantry divisions.
12. Interestingly, the 2nd Battalion was the only battalion of the Burma Rifles to survive the Japanese invasion. The unit was first raised in 1917 as 2nd Battalion, The 70th Burma Rifles, a regular battalion of the Indian Army. When Burma was cleaved from India in April 1937, the unit became 2nd Battalion, The Burma Rifles. On 1 December 1940, the battalion moved to Moulmein, falling under command of the Tenasserim Infantry Brigade Area, and effective 1 July 1941, the 2nd Burma Brigade. As part of a broader strategy to deny the Japanese airfields in Tenasserim, the battalion redeployed to Mergui on 1 October. The unit remained at Mergui, dispatching a company to Bokpyin on 26 December. On 20 January 1942, the battalion was withdrawn to Rangoon. During February the unit was attached first to the 16 Indian Infantry Brigade, and then the 17 Indian Infantry Division before returning to the command of 2 Burma Brigade Group on 21 February. The battalion later withdrew with other British and Indian forces to India. When the British counteroffensive began, the battalion returned to Burma, where it fought for the remainder of the war.
13. See, for example, WO1 “French Toast and Bacon.” The second SSR permits an off-board howitzer to operate in a direct-fire mode.
14. Due to Ammunition Shortage, the Ammunition Depletion Numbers of the Japanese 50mm mortar are lowered by one. The chances of “finding” a WP round are therefore reduced to around 27 percent. Even so, WP will only create a Flame in jungle or bamboo on a Dice Roll of 10 or greater (B24.32).
15. Today, Tavoy is officially known as Dawei. The new name apparently refers to a local ethnic group, but many current and former residents still refer to the town as Tavoy.
16. Vivian Alexander Chiodetti was born 31 May 1905 in Rawalpindi, India. He enlisted in the British Army in 1925, and was commissioned into the Manchester Regiment in 1928. In September 1938, he was attached to the Burma Defence Force. Following the Japanese invasion, he served with the Burma Rifles until his death.
17. Radios had proven unreliable in the Burmese rain forests. Fungus grew rapidly on components, and the dense jungle inhibited the receipt and transmission of signals.
17. Radios had proven unreliable in the Burmese rain forests. Fungus grew rapidly on components, and the dense jungle inhibited the receipt and transmission of signals.
18. Colonel Suzuki’s clandestine organization was originally called Minami Kikan. And its original mission was the closure of the Burma Road with the aid of Burmese nationalists.
19. Whereas the British avoided recruiting Burmans, the Japanese sought them out, preferring them over Chins, Kachins, and Karens.
20. The Japanese were not organized to arm the flood of new BIA recruits, but as the campaign wore on there was no shortage of abandoned and captured weapons with which to arm them.
21. Japanese leaders increase the Morale Level of all other friendly Infantry units in the same Location by one (A25.221, and G1.41). The downside of the commissar effect is that a Commissar must attempt to rally broken units in its Location (25.222), including any Allied units. I also see nothing that would prevent a BIA unit from going berserk automatically, if stacked with a Japanese leader that went berserk.
22. The steeplechase traces its origins to the British Isles. Riders on horseback would race from the steeple of one town to the next. The steeples were excellent landmarks visible over long distances. During the race, the horsemen frequently had to jump streams, hedges, fences and low stone walls separating estates.
23. There are a couple of other caveats related to the number of MF available to the unit at the time it advances. Unless you are confident that you understand all of the implications of section A4.72, I urge you to review this short but nuanced rule.
24. The only unit in the game capable of such a feat is in fact two units in one. The 290mm Petard spigot mortar on the Churchill Armoured Vehicle, Royal Engineer (AVRE) can create breach in a wall, hedge, or bocage. The crew of this vehicle can accomplish the same when it takes counter form, and uses one of the four, special DC carried inside the vehicle. (British Vehicle Note 37). It pays to read the ASL Rules & Errata subforum on GameSquad regularly.
25. The Gurkhas portrayed in Andrew Rogers’ J150 “Sangshak Redemption” are quite varied. The scenario takes place in Sangshak, India in March 1944. Although the MMC representing the 153rd Gurkha Parachute Battalion share an underscored Morale Factor, they have different Strength Factors. In my view, the mix of 6-4-8, 4-5-8, and 4-5-7 squads in the Gurkha OB gives the force are more realistic character.
26. Players are instructed to place a spare board along the tightrope separating these areas. I would recommend a mounted board for the task. I would also recommend a healthy buffer zone between the boundary and any counters that set up adjacent to it. Nothing spoils an ASL party like toppled stacks, especially formerly concealed ones.
27. Up until May 1942, the zenith of Japanese power in the Pacific, Good Order Japanese units may accept the surrender of most enemy units, and capture them in CC. The Chinese and Japanese have more history. Beginning in 1938, NQ is always in effect whenever these arch rivals face each other (G18.7).